Installation
Installation by systems
Magento 2
Here you can learn how to set up cobby in Magento 2 so that cobby can synchronize your shop data. You can also watch our how-to video or read the step-by-step instructions below.
Video: How to set up cobby in Magento 2
Magento 2 - Portal Setup Guide | cobby.io
Step by step
First log in to the cobby portal at app.cobby.io. 1. Create workspace
To do this, click on the little arrow on the left (1), which will also show all existing workspaces. To add one, click on Create new (2).
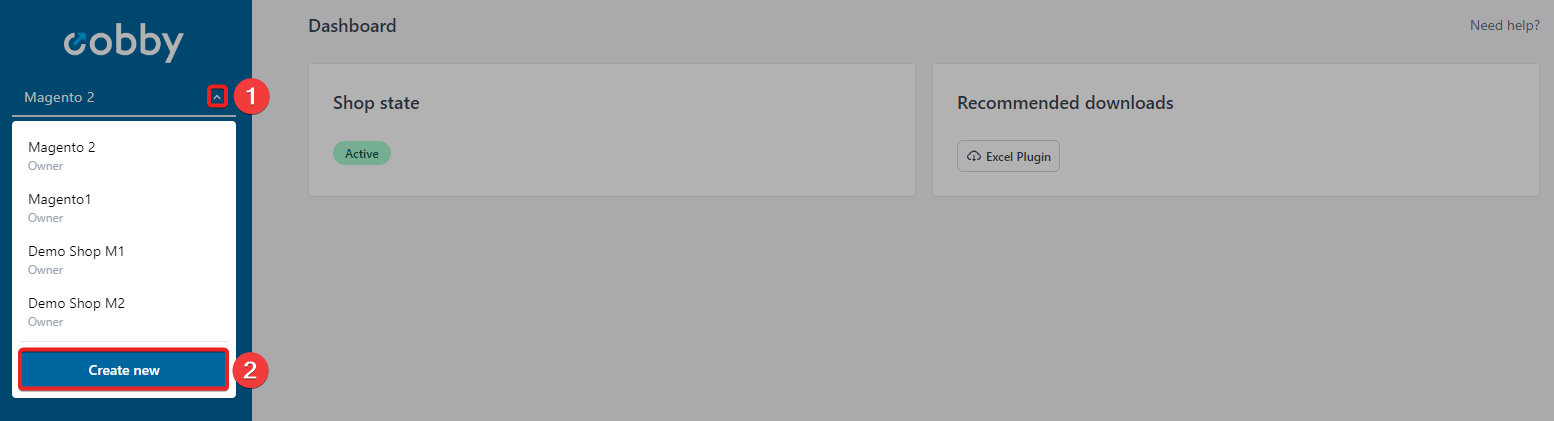
Give your workspace a name and click on Create.

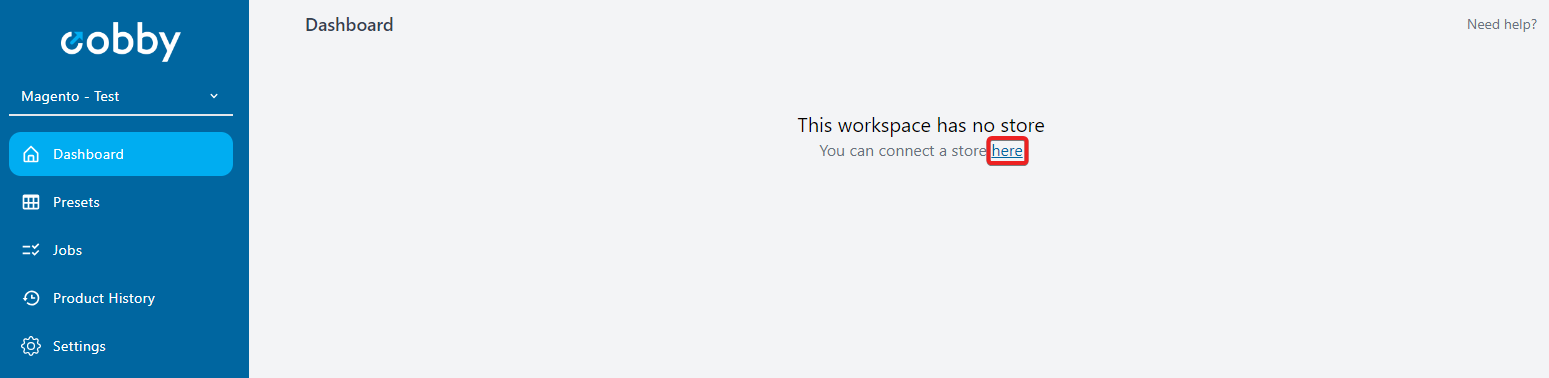
2. Choose shop system
Your workspace isn't connected to a shop yet. Click on here to go further and click on Magento 2 as your shop system.
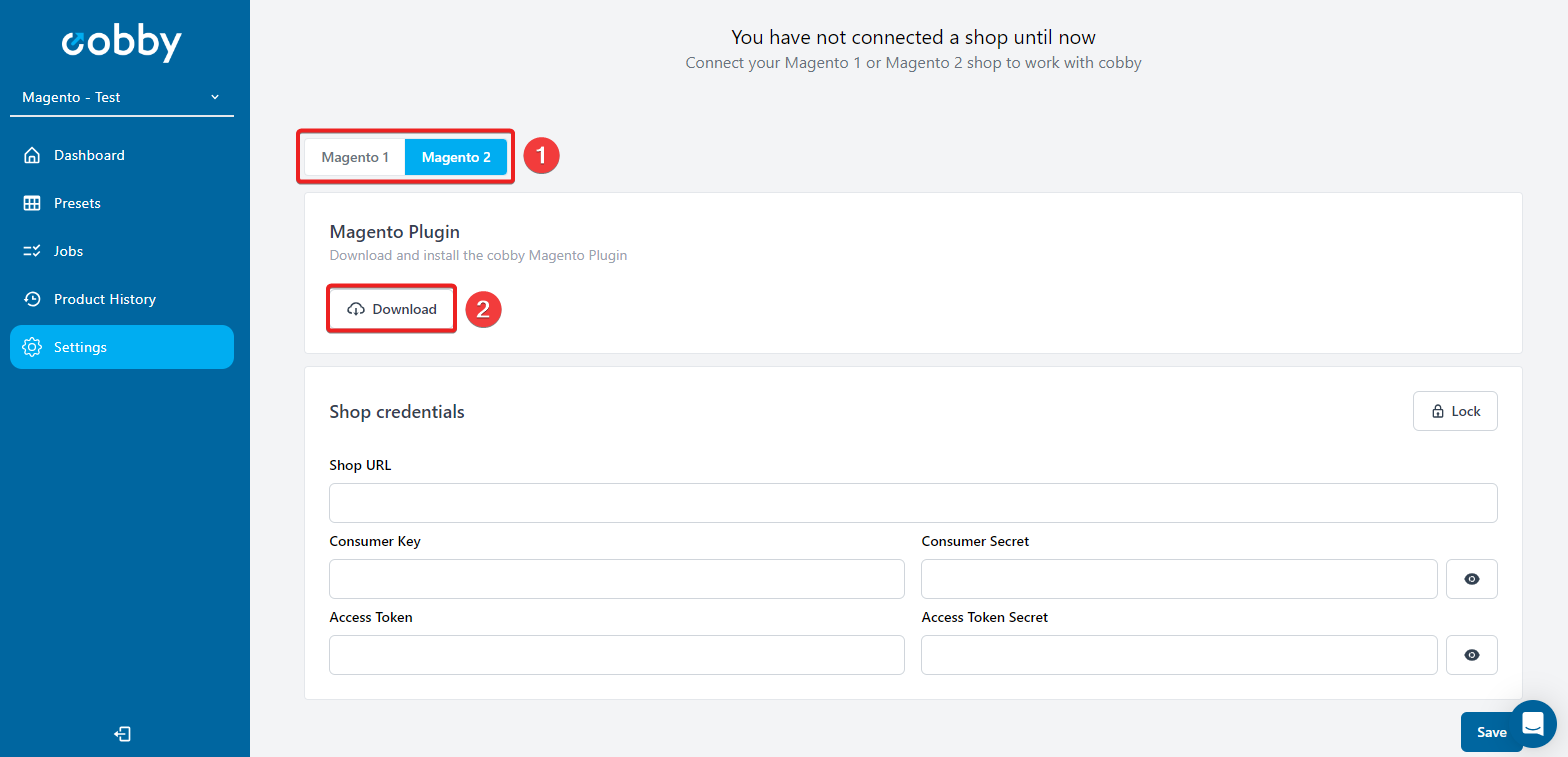
3. Download cobby extension
You can download the cobby extension for Magento 2 in the first step of the setup. Now you have to install it in your Magento shop. A short tutorial on how to do this can be found here on Github.
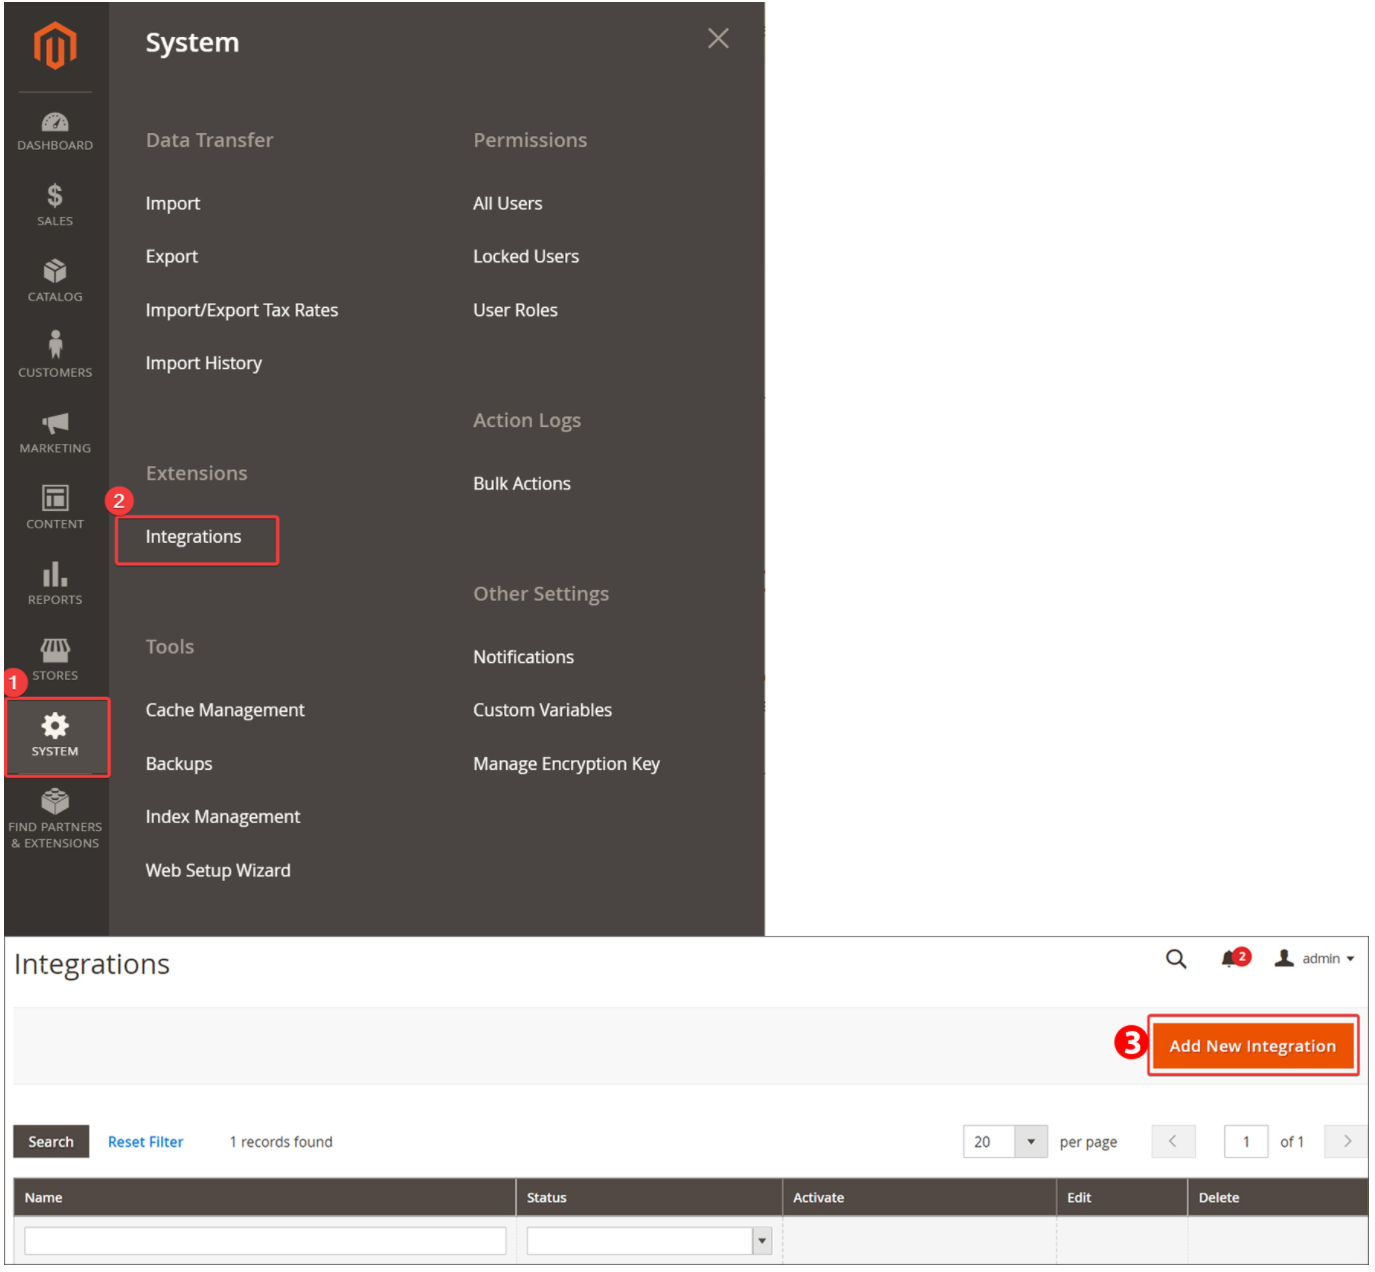
4. Add new integration
Go to your Magento Admin Panel and log in. Then go to System (1) → Integrations (2) and click Add New Integration (3) in the upper right corner.
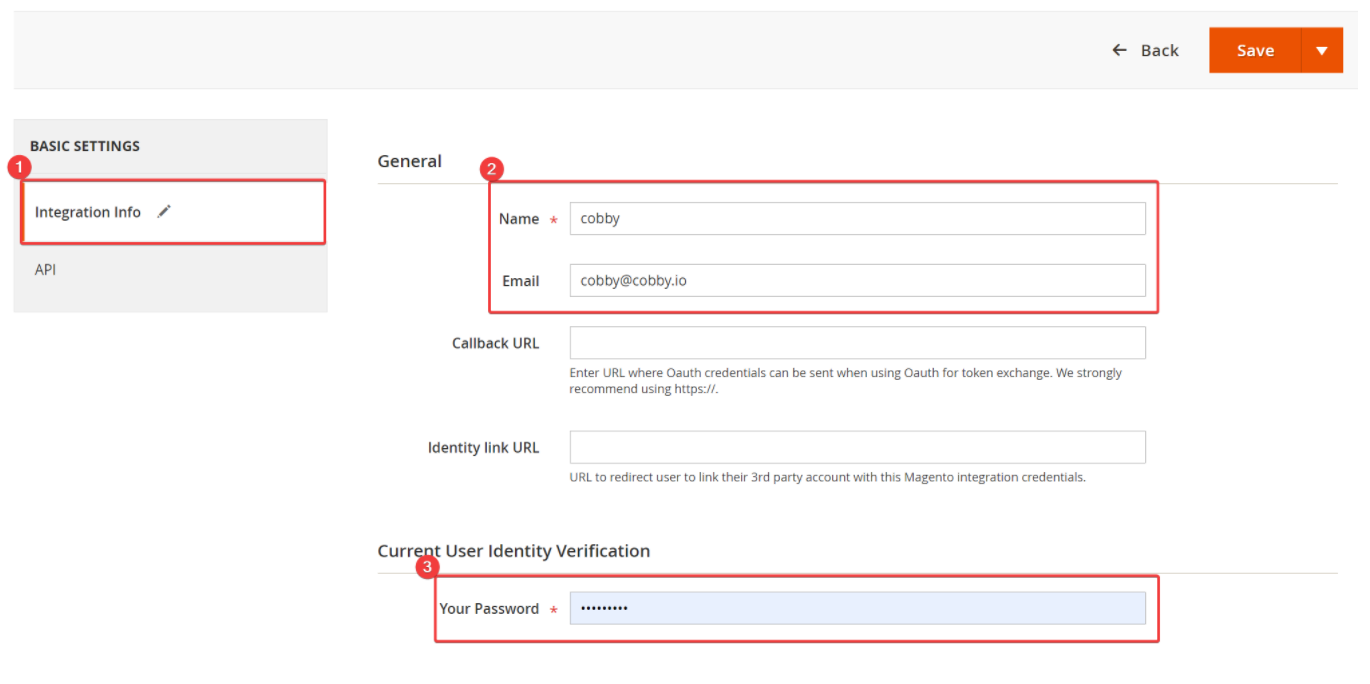
5. Integration info
A new entry mask (1) will open. Please enter cobby as name and your email address (2). Under Your Password (3) enter your Magento backend password.
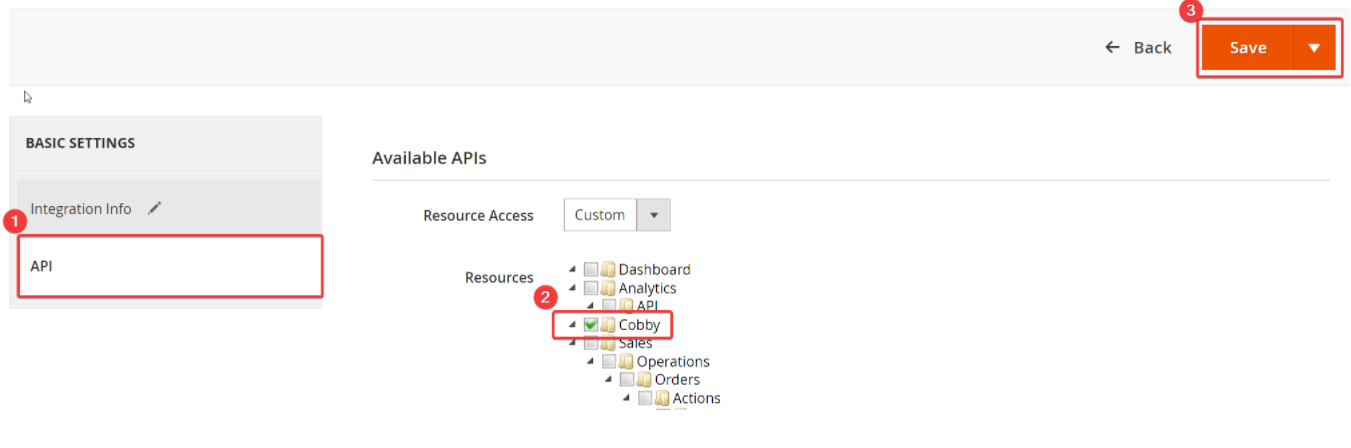
6. API
Now switch to the API (1) section. Check cobby (2) and save the process (3).
7. Activate
After you have saved the setting, you will be redirected to the initial page. With the click on Activate (1) a new mask opens. Here please only click on Allow (2) in the upper right corner, then the input mask opens with the required information.

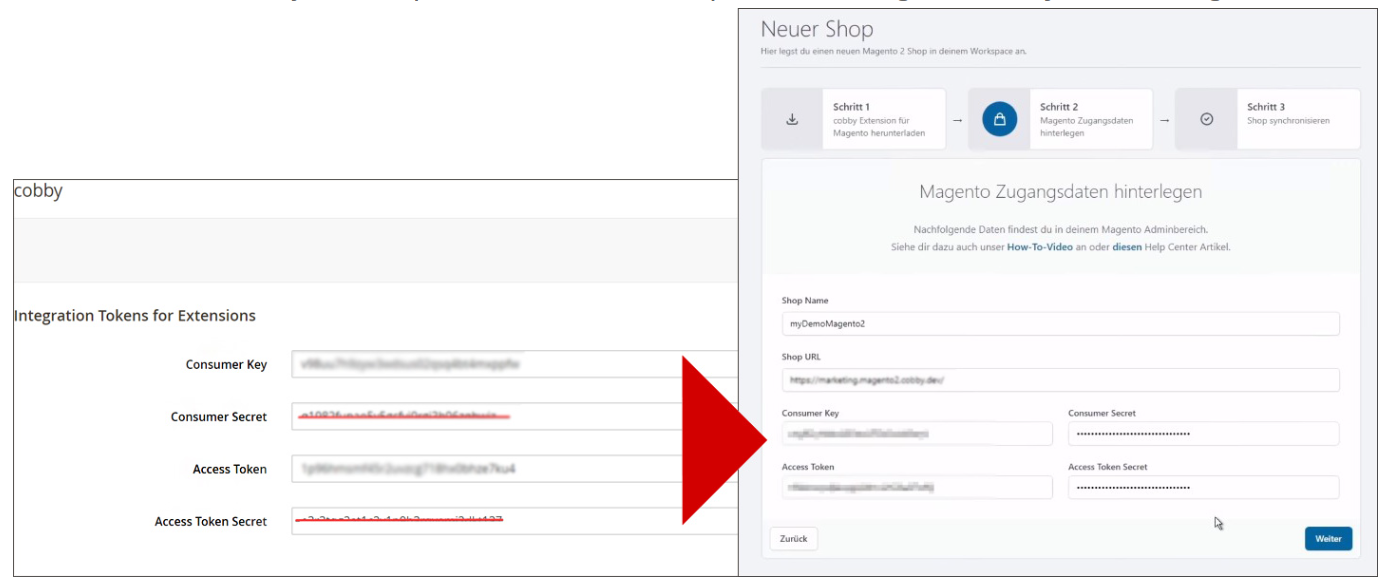
8. Transfer access token to the portal
In this mask you will find your login token, which you need to integrate cobby. You can copy this data and paste it into the workspace settings in the cobby portal.
9. Save
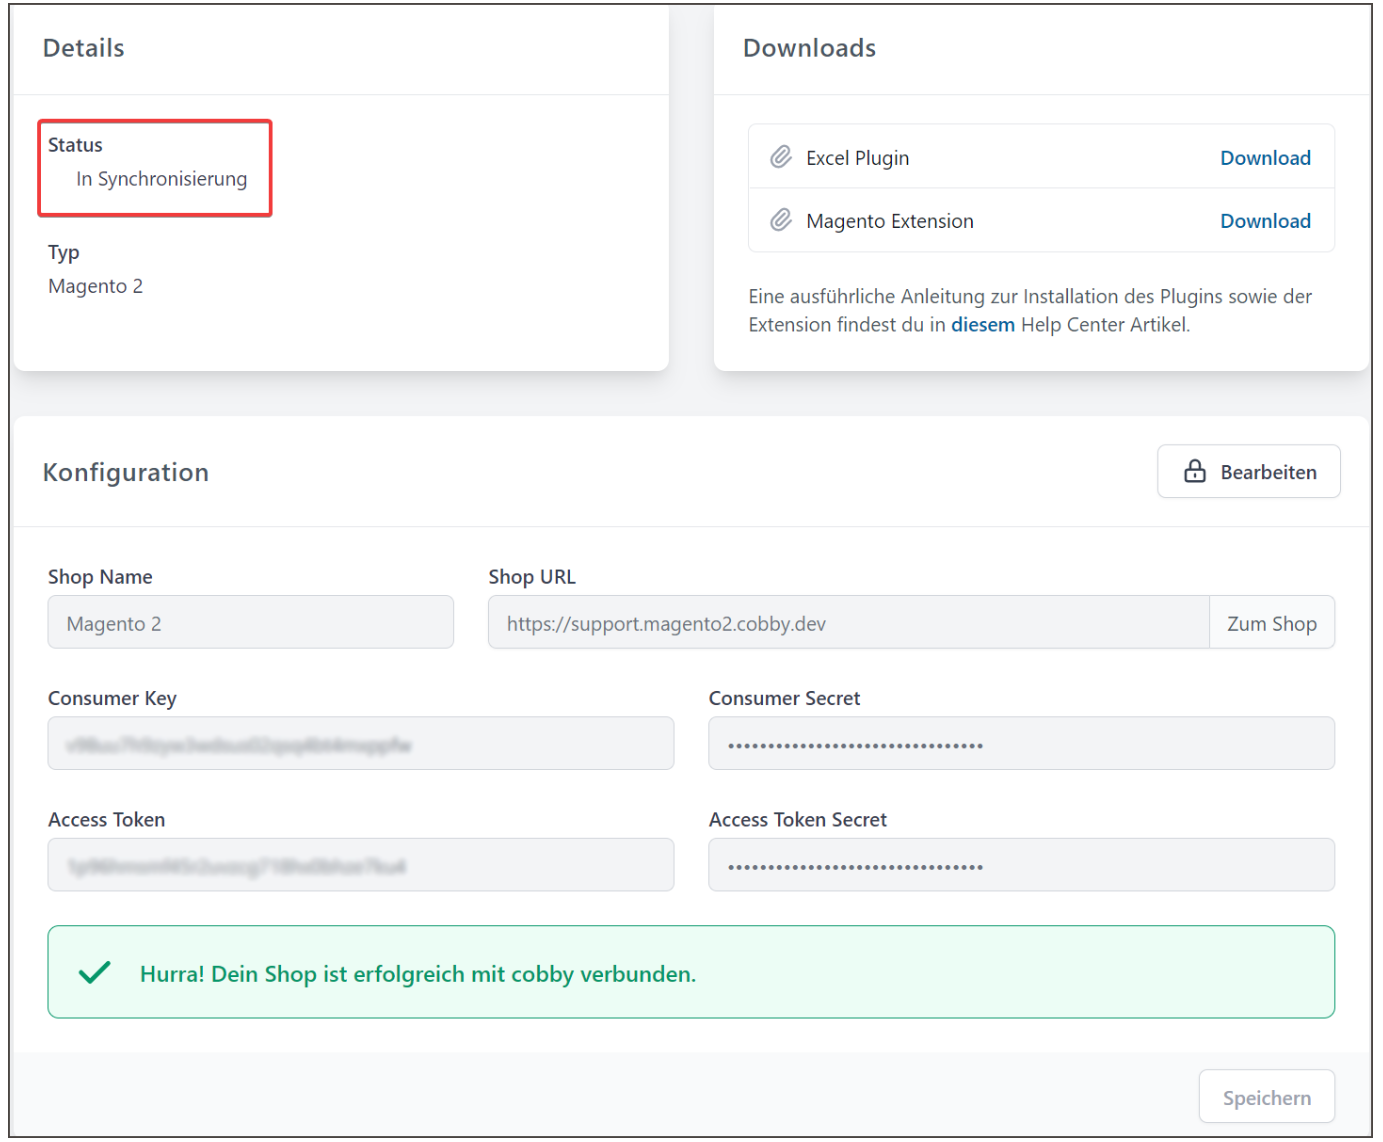
After you have transferred the data from your Magento backend to the cobby portal, click save in the portal. Then the status display will show In synchronization. As soon as the status display changes to Active, your shop data is successfully synchronized with cobby. This may take some time depending on the amount of data. Afterwards you will find a download link for the cobby Excel plugin in the customer portal (under Downloads), which you also have to install.
Magento 1
This is the detailed guide to installing or upgrading your cobby Magento 1 installation.
Please follow the instructions carefully, as any missed step can lead to problems during the installation. Once this process of installing cobby is complete, you can proceed with configuring the extension in Magento.
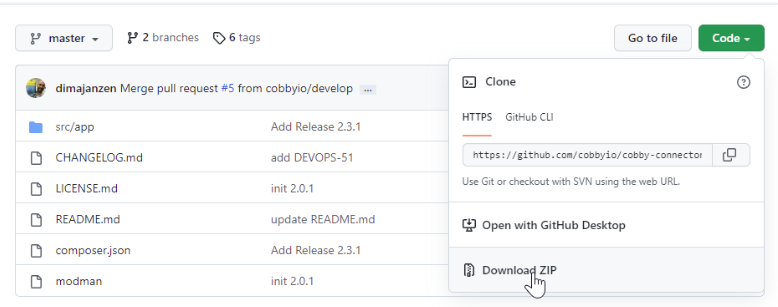
Download cobby extension for Magento 1
In the public repo you can download the latest cobby extension for Magento 1: https://github.com/cobbyio/cobby-connector-magento
Latest Version
The latest versions of the extension can be viewed via the public repo: https://github.com/cobbyio/cobby-connector-magento/releases/latest.
Install cobby extension for Magento 1
Please note: It is strongly recommended to make a backup copy of the server files and database before installing this module. No responsibility can be taken for any negative effects it may cause. It is also recommended that you first install the module on a test server to perform your own tests.
- Turn off the Magento compiler if it is enabled under
System->Tools->Compilation. - Make sure that the cache is enabled in the administration under
System -> Cache Management. - Unpack the zip archive.
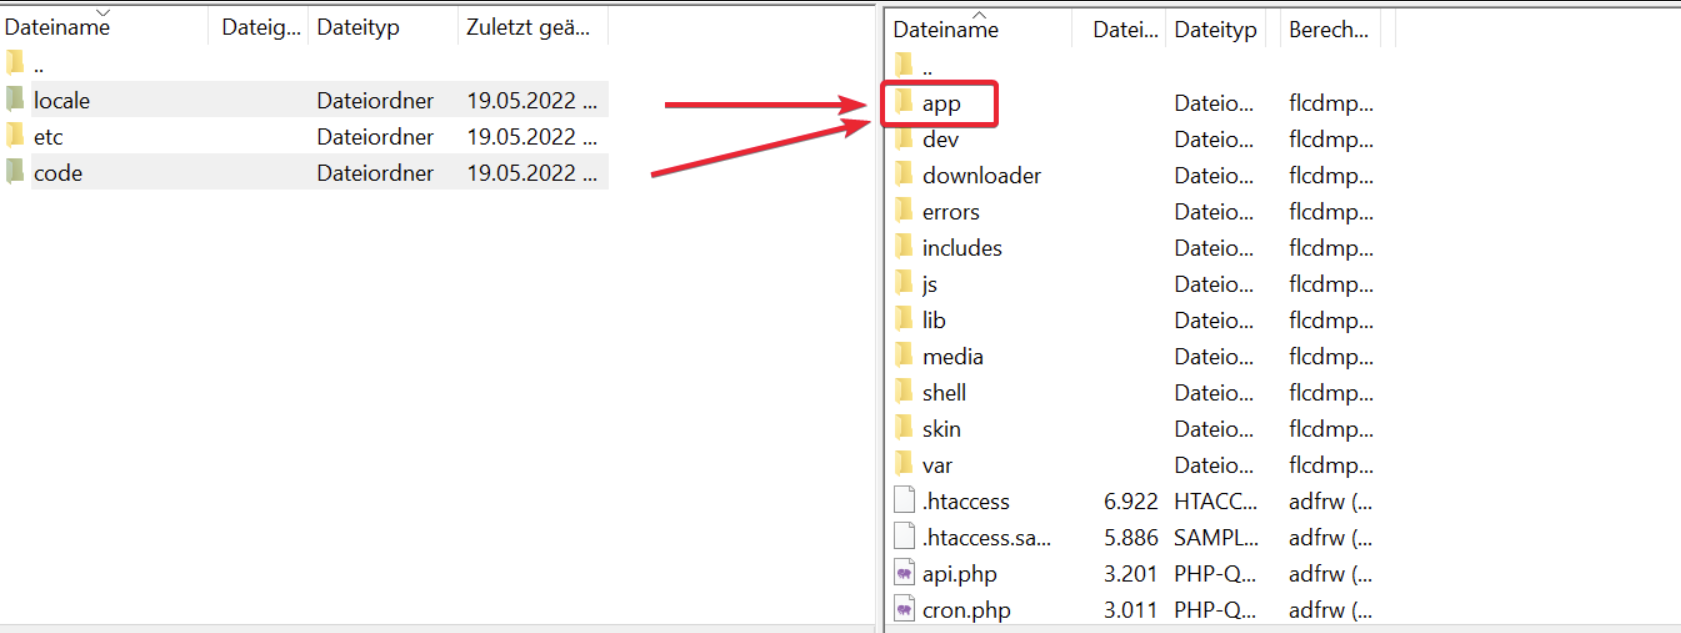
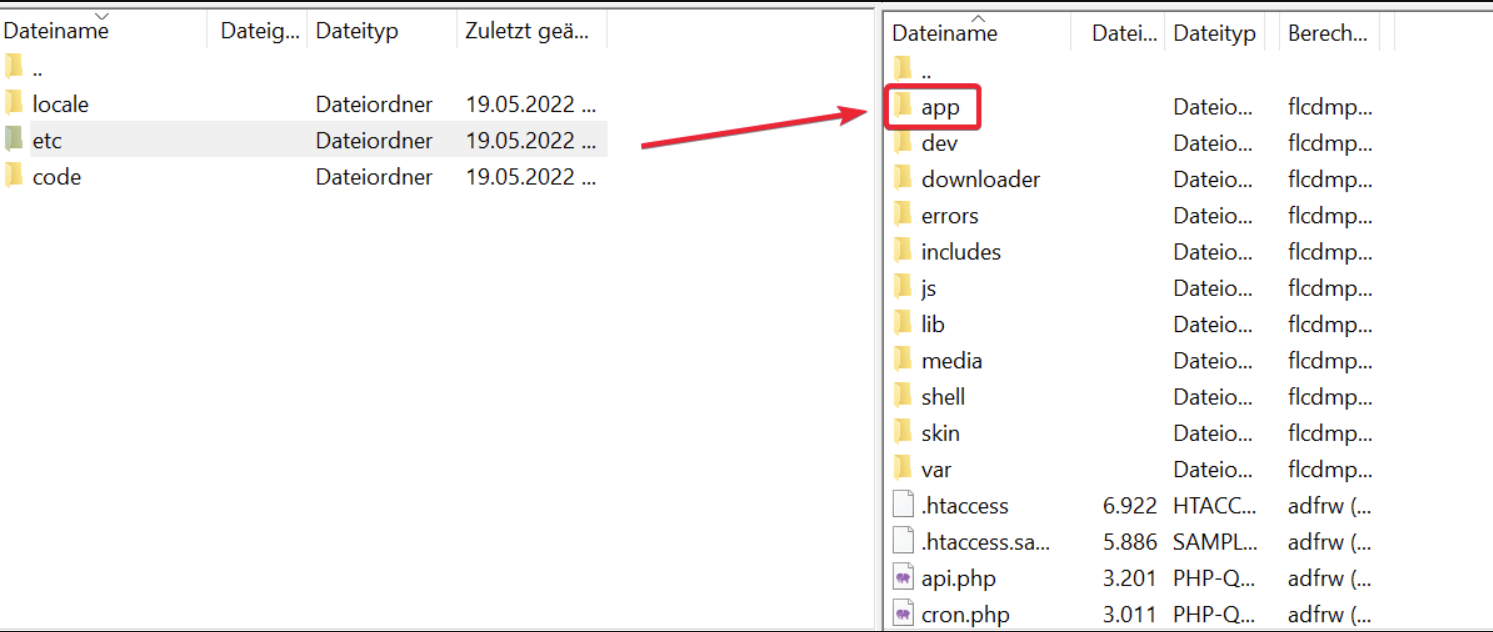
- The unzipped content must be uploaded to the server via SFTP or FTP. For this, the connection to the Magento server must be established first. Go to the root directory and upload the appropriate files to the root folder. The root folder contains subfolders like app, downloader, errors etc.
Tip: One of the best free FTP tools for the process is Filezilla.
- Copy the contents of the app directory (except for the "etc" directory, which is copied last) from the unzipped zip archive to the app directory in the Magento base directory.
- Copy the contents of the app/etc directory from the extracted zip (which was omitted in the steps above) from the app/etc directory to the Magento base directory. (Copying this last step will greatly reduce the chance of SQL not running correctly).
- Now log out as admin first and then log in again. If this is not done, the error message 404 Access Denied appears.
- Deactivate the cache in the admin area.
- Empty the Magento cache memory in the cache management by clicking the
empty Magento cachebutton. (The contents of/var/cacheandvar/sessioncan also be removed manually). - Open the front end of the website to force the extension to load. This will ensure that the SQL updates are performed within the extension.
- If the compiler is used, recompilation must be done via
System->Tools->Compilation. If this is not done, an error (similar to 'Call to a member function toOptionArray() on a non-object...') will be seen when accessing dispatch methods. A fatal error for missing files may also occur. - The extension has been installed and should now be visible in the corresponding area of the backend.
- Activate the cache in the administration and update the administration.
- You can now access cobby under System→Configuration→Services→cobby.
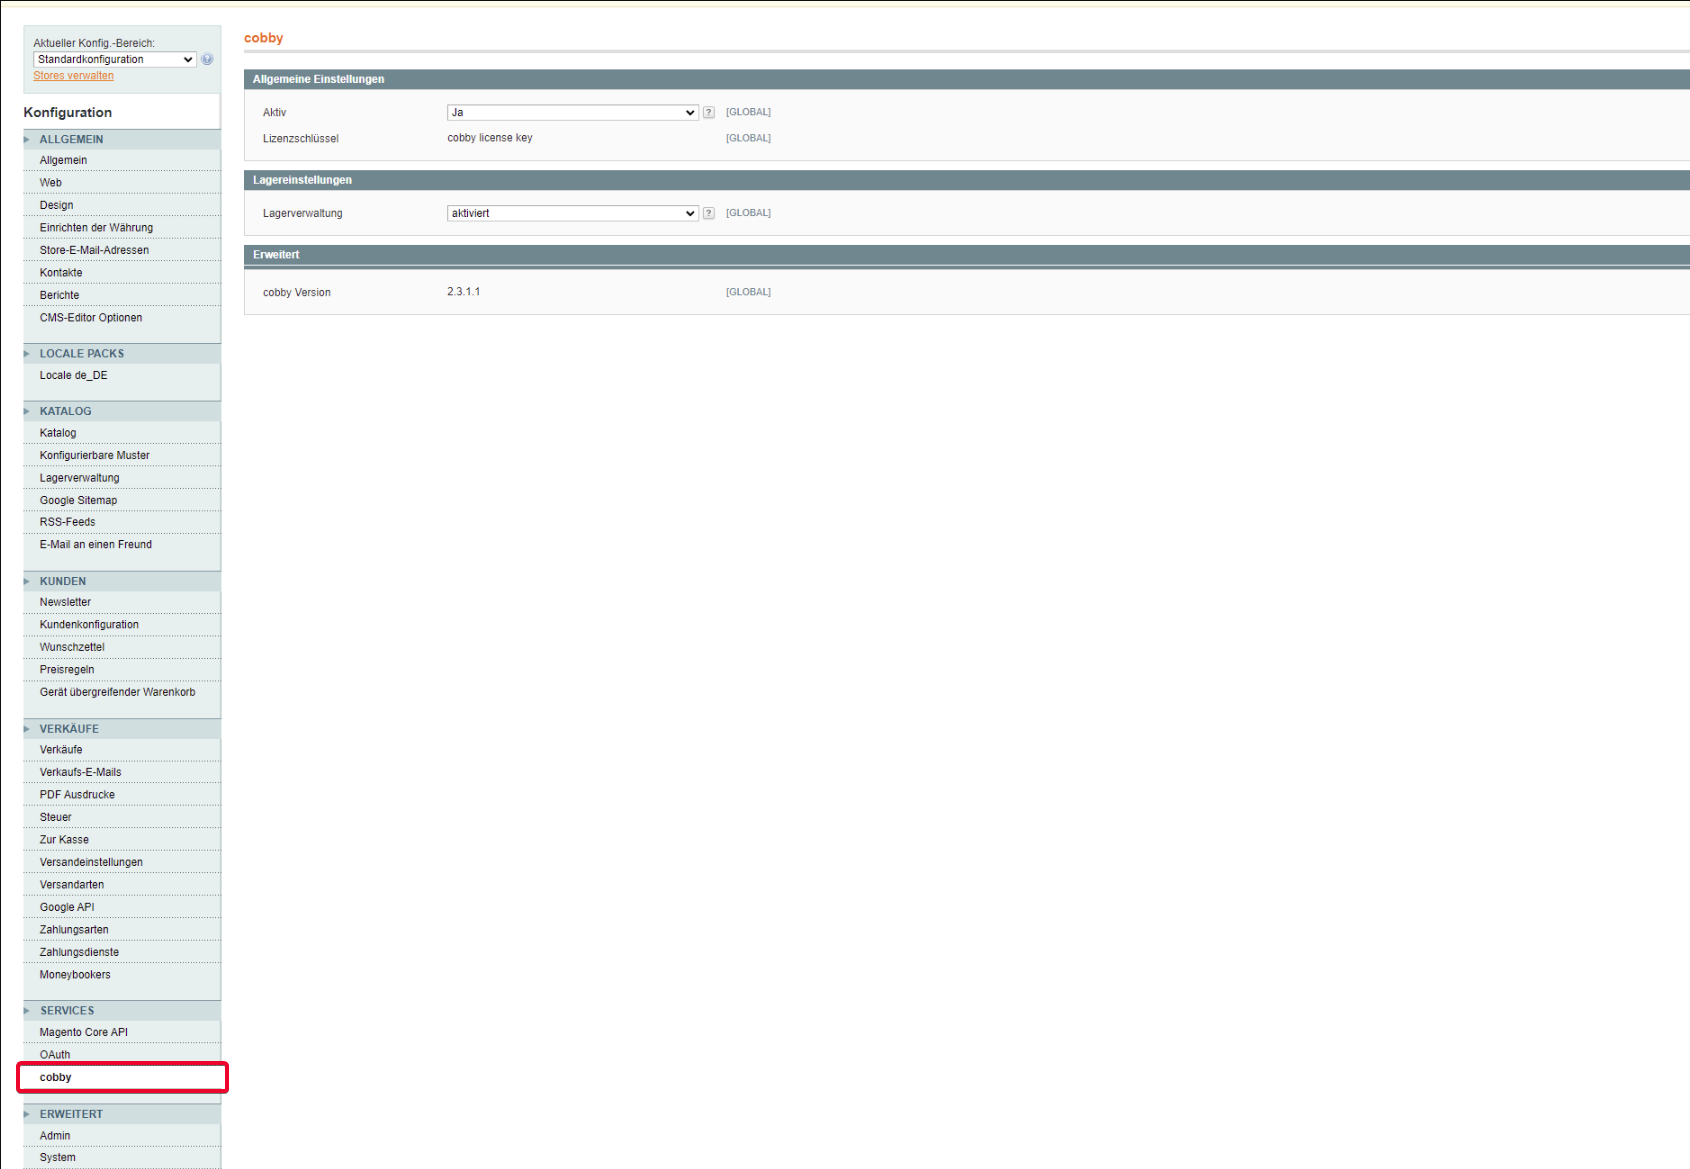
Set up cobby in Magento 1
You want to get started with cobby? This step-by-step guide explains how to set up the cobby extension in Magento 1 so that your shop data can be synchronized with cobby.
Feel free to watch our how-to video or read the step-by-step instructions.
Step by step
First log in to the cobby portal at app.cobby.io.
Video: How to set up cobby in Magento 1
Magento 1 - Portal Setup Guide | cobby.io
1. Portal: Create workspace
If you have successfully logged in to the cobby portal, you can create a new workspace. Click on the little arrow on the left (1) and then on Create new (2). Now you can give your workspace a name, which you can change later. Then click on Create to create your workspace.
2. Portal: Choose shop system
Once you have created your workspace, you can select your shop system: Magento Version 1.
3. Portal: Download cobby extension for Magento 1
In the first step of the setup you can download the cobby extension for Magento 1 (2). Now you have to install it in your Magento shop. You can find a short tutorial on Github.
4. Magento 1: Create cobby Role in the backend
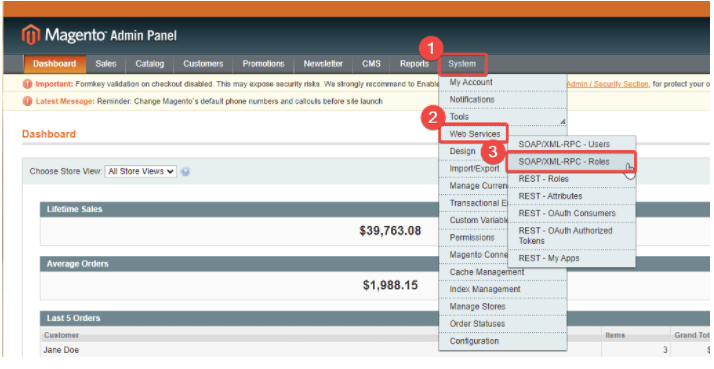
A new mask will appear in the portal where you have to enter the user name and the API key. These are created in the Magento 1 backend. Please log in to your Magento admin panel for this. In the Magento 1 Admin Panel click on System (1) in the upper menu bar and select Web Services (2) → SOAP/XML-RPC - Roles (3) in the dropdown menu.
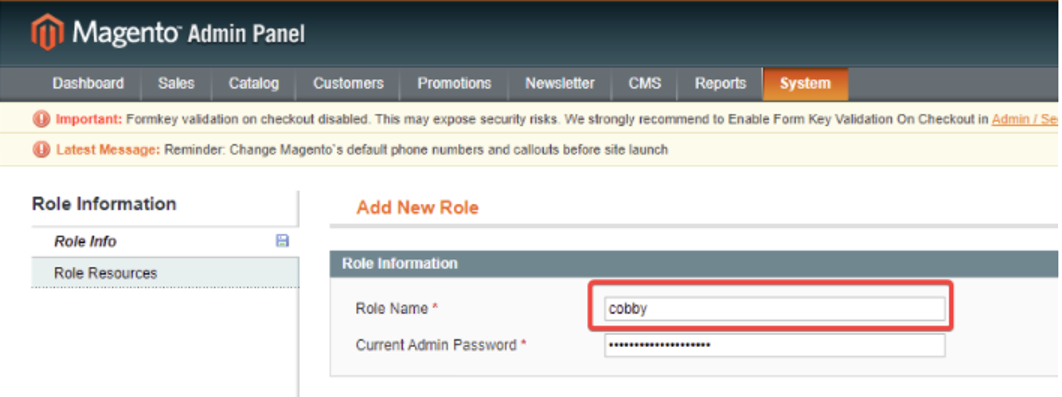
5. Magento 1: Add New Role
Clicking Add New Role (1) opens a new mask.
6. Magento 1: Add Role information
As Role Name you enter the name cobby and set an Admin Password. You can define the Admin Password as you wish.
7. Magento 1: Choose Role Resources
Once you have entered the name and password, click on Role Resources (1). Select the folder cobby from (2), set a checkmark and save with a click on Save Role (3) in the upper right corner.

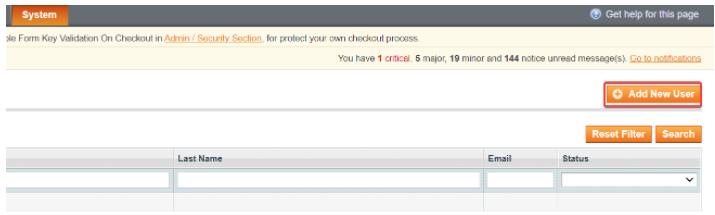
8. Magento 1: Create new user
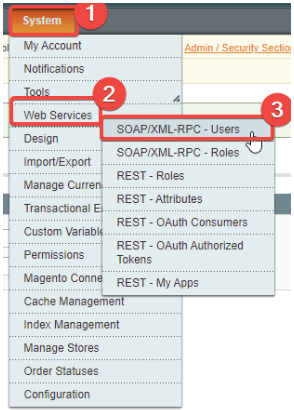
Now click on System (1) in the upper menu bar and select Web Services (2) → SOAP/XML-RPC - Users (3) in the drop-down menu. Then click Add New User (4) in the upper right corner.
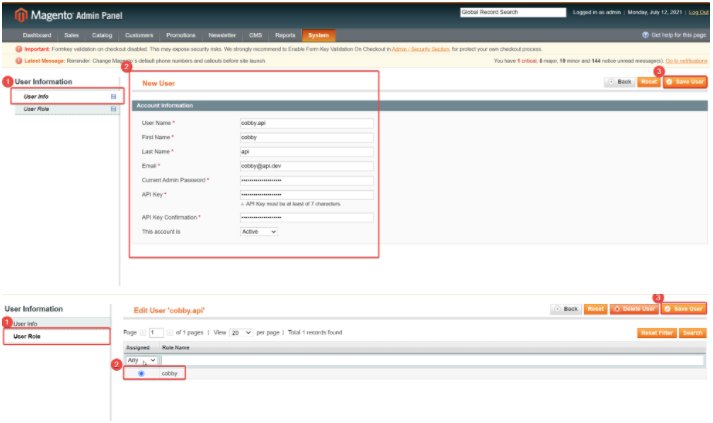
9. Magento 1: Enter User Info
Now click under the menu item System on User Information → User Info (1). Enter a user name and any Api key (2). These data are needed in the cobby portal.

10. Magento 1: User Role
Once all the mandatory fields of the new user are filled in, go to User Role (1), select your previously created Role Name (cobby) (2) and save the user (3).
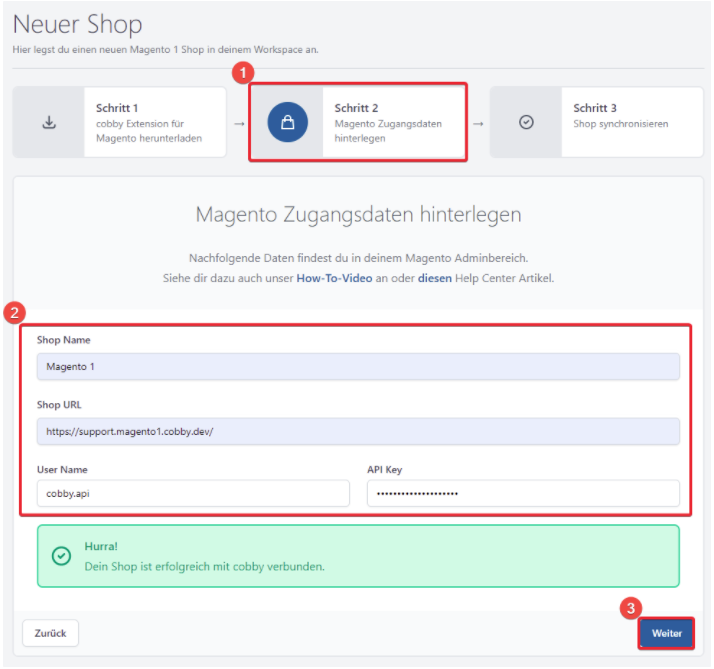
11. Portal: Transfer data
In the cobby portal you can now fill in the required fields. To do this, enter your shop URL, the User Name previously created in the Magento backend and the corresponding Api Key (2) and confirm your entries by clicking Save.
12. Magento 1: Save configuration
Finally, the configuration must be saved. Proceed as follows: Magento 1 Backend → System → Configuration. In the new screen click on Save Config in the upper right corner. Next to the label cobby version the text should turn green.
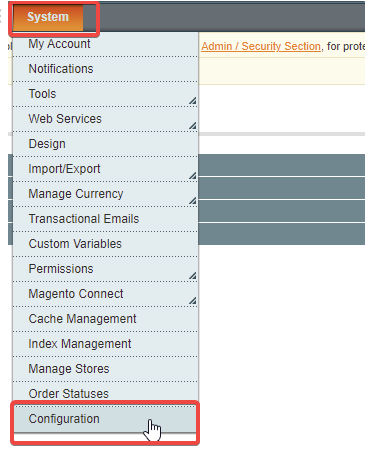
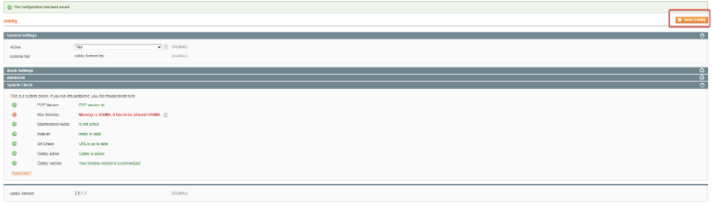
Done! The cobby extension is now saved in Magento 1.
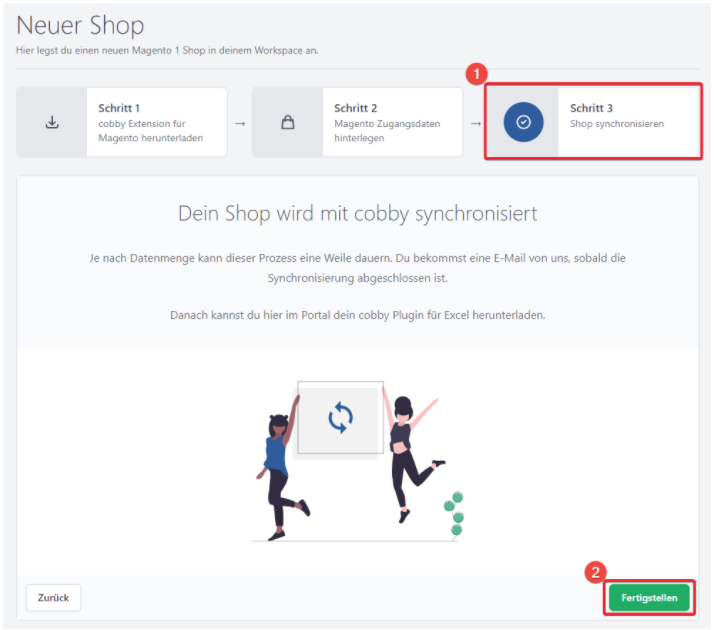
13. Portal: Synchronization
Now your shop data will be synchronized with cobby. This can take a while depending on the amount of data. When you switch to the cobby portal, you will get a new overview. Under Downloads you can download your cobby Excel plugin.
Excel
To work with cobby in Excel, you need to download and install the cobby Excel plugin, which you will find in the cobby portal. In this tutorial you will learn how to do that.
First login to the cobby portal at app.cobby.io. Your shop must already be created in the portal. If you don't have a shop yet, see the installation instructions for Magento 1 or Magento 2.
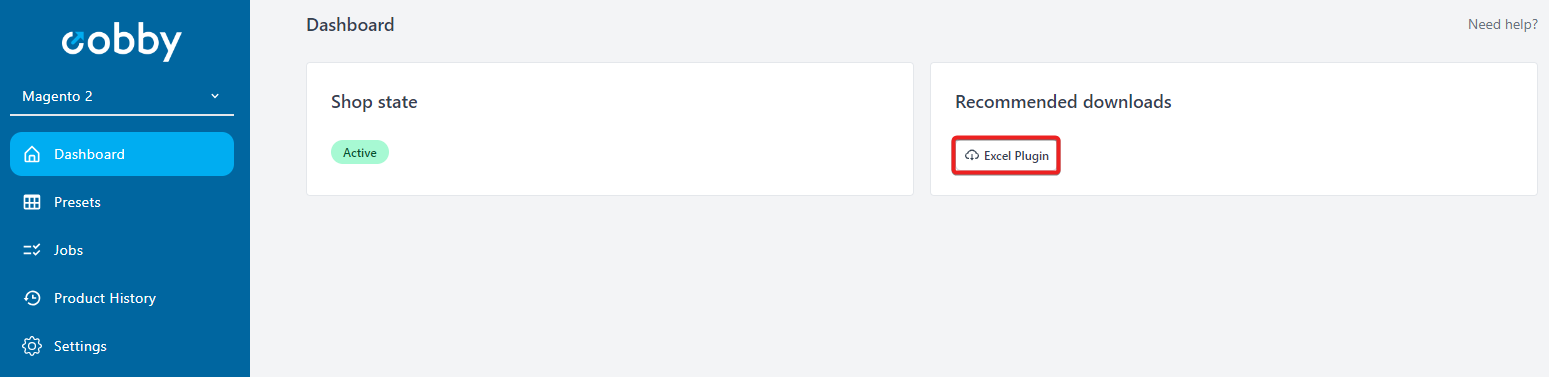
1. Download plugin
Under Dashboard you will find the download link for the Excel plugin in the section "Recommended downloads".
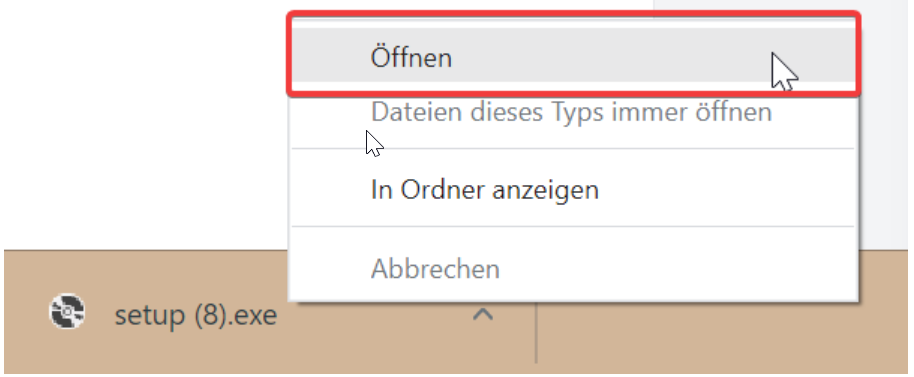
2. Run plugin
You can open the downloaded file with a right click.
3. Install
Now another window appears. Now click Install → wait until the download is completed → Close.
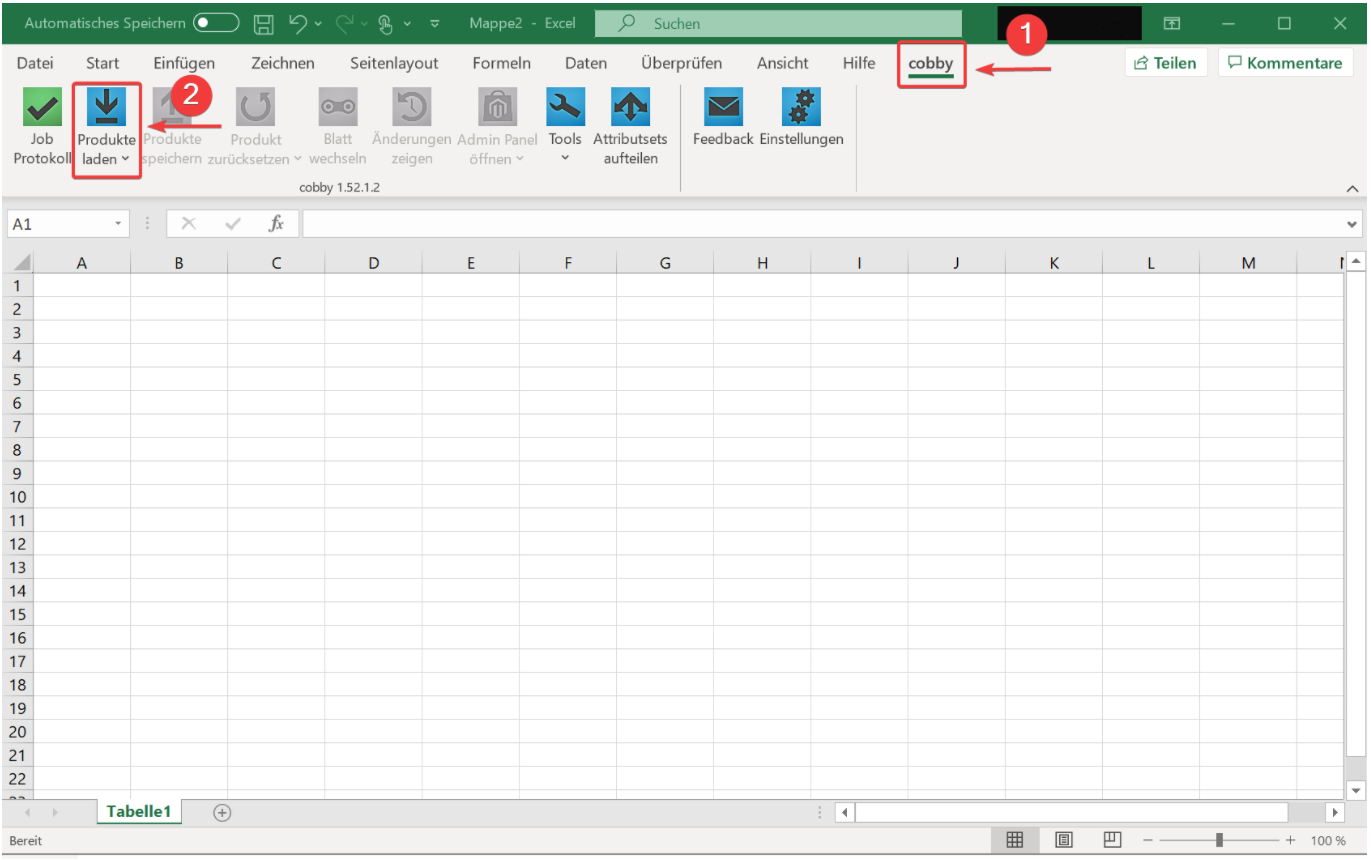
4. Load products
Now open Excel, click on cobby (1) and load products (2). Now all shop data will be loaded into the Excel file and you can start editing.
Onboarding
Create workspace
Your workspace serves as the basis and "work surface" for your online shop, as it bundles the various channels, such as your shop and an ERP system or marketplace, and you can thus access all product data and edit it with cobby. You will find an overview of all important information about your shop when you select your respective workspace.
Please note: It is possible to create more than one workspace. This is necessary e.g. if you still have a staging or if you switch from Magento 1 to Magento 2, because each workspace is assigned only one license, which is unchangeable.
How exactly is a workspace created in the cobby Portal? In this step-by-step guide you will learn everything you need to know.
1. Create workspace
- Click on the little arrow on the left to add a new workspace.
2. Enter name
Now enter a unique name and click on "Create".
3. Add shop
Now you can add your shop by choosing a shop system and downloading the respective cobby Magento plugin. For detailed instructions on how to connect your shop for Magento 1 or Magento 2, please refer to the corresponding installation section.
Best Practice
Increase performance
Requirements for optimal use of cobby
- Excel 64-bit version
- good hoster: the system always adapts to the performance of the hosting. When we import data, first "a lot" of data is transmitted and based on the speed/response time, the size of the transmitted partial dataset is decreased or increased, so the speed of processing the datasets depends on the hoster and not on us.
- if necessary, ignore formula relations (cobby tab → Settings button): By activating the option, formula relationships that refer to areas outside the row will be ignored. Formula relationships are preserved, only the product status no longer changes to yellow when a linked cell is modified. Mass changes are calculated faster by activating the option.
When should this function be used?
- if the linked data is not changed after setting the formula
- when working only with formulas related to the own product attributes/row.
- if necessary, set calculations in Excel from automatic to manual (Formulas tab → drop-down menu of calculation options "manual")
With this option enabled, formulas are not automatically recalculated due to value changes in a cell, but the user must select the "Calculate workbook" option. This function can lead to a significant time saving and a reduction of the calculation effort.
FAQ
What are the system requirements for cobby?
Here you can find an overview of all system requirements for cobby.
Windows
- Windows 7 with Service Pack 1 (32 bit and 64 bit)
- from Windows 8.1 Server 2008 R2 Service Pack 1 (32 bit and 64 bit)
- from Windows Server 2012 (32 bit and 64 bit)
Mac or Linux
cobby requires Microsoft Windows and Excel from version 2007. If you want to use cobby on a non-Windows system, this only works with a virtual machine. On the Mac this can be Parallels or VMware fusion, under Linux for example Virtual Box.
Excel
- from Excel 2007 (exception: Excel Starter)
- recommendation: Excel 2016 bzw. Office 365 / 64 bit version
Excel for Mac and Open Office is not supported.
Magento
- Magento 1 Community Edition from version 1.6 and Enterprise Edition from version 1.12
- Magento 2 Community Edition and Enterprise Edition from version 2.3
Which URLs are used by cobby in the shop?
Until cobby version 1.40
cobby must reach the following URL for communication with our services:
- Protocol/ShopURL/index.php/api/mash2/json
After cobby version 1.40
cobby must be able to reach either
- Protocol/ShopURL/index.php/api/mash2/json or
- Protocol/ShopURL/api/mash2/json
For Magento 2
cobby must be able to reach the following URL:
- Protocol/ShopURL/index.php/rest/
If the URL rewrites are used, it should be ensured that this URL is not redirected in your shop. The URL should be excluded from rewrites.
Which Microsoft Office version do I have?
It is helpful to know which version of Microsoft Office is installed on your computer. This is how you find out which Microsoft Office version is currently installed.
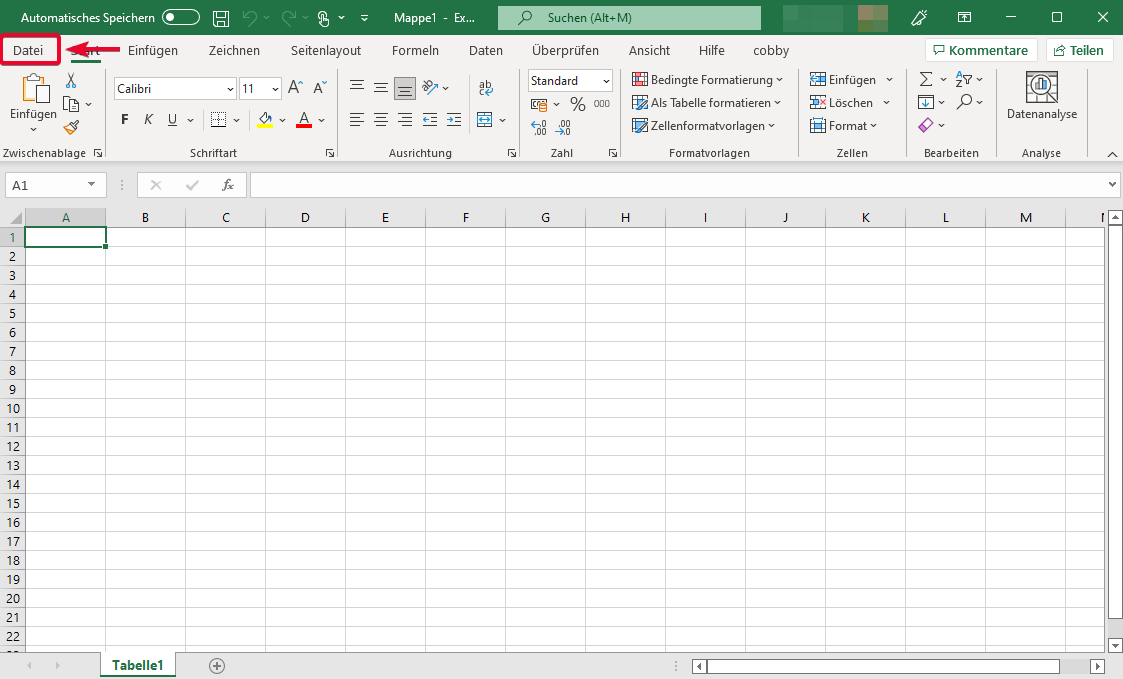
1. Open Excel: Open Excel, select any Excel folder and click File in the upper left corner.
2. Open account settings
- Now go to Account in the left column.
- Then go to Product Information Microsoft Office.
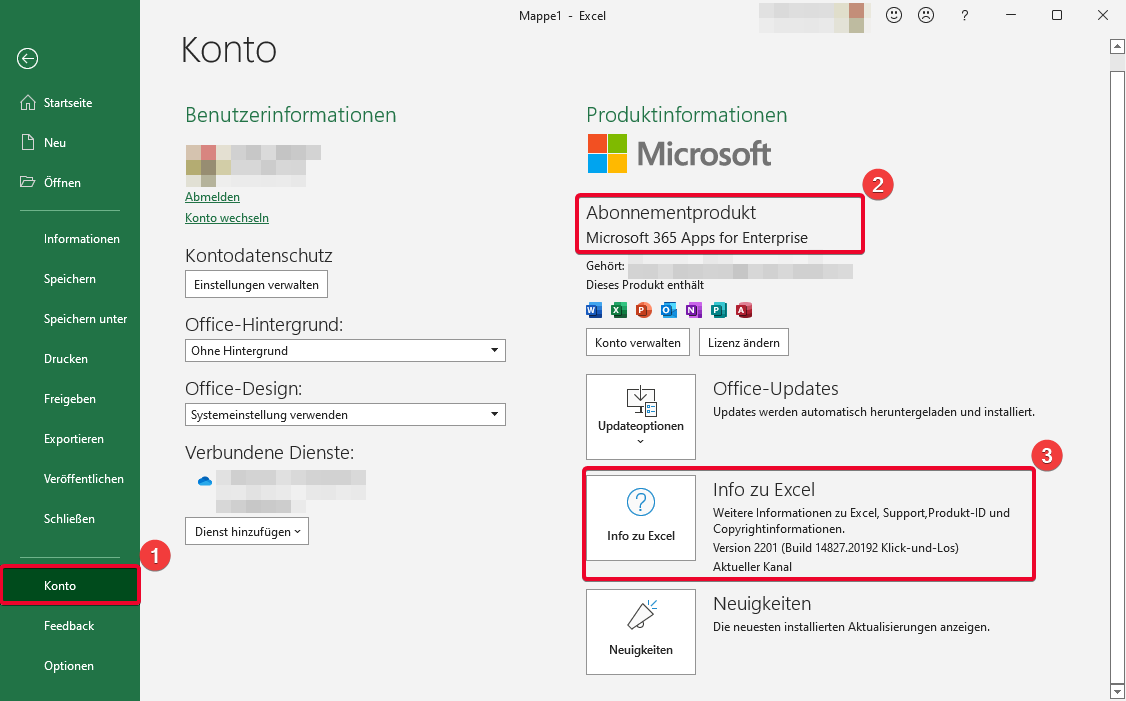
3. Info about Excel:
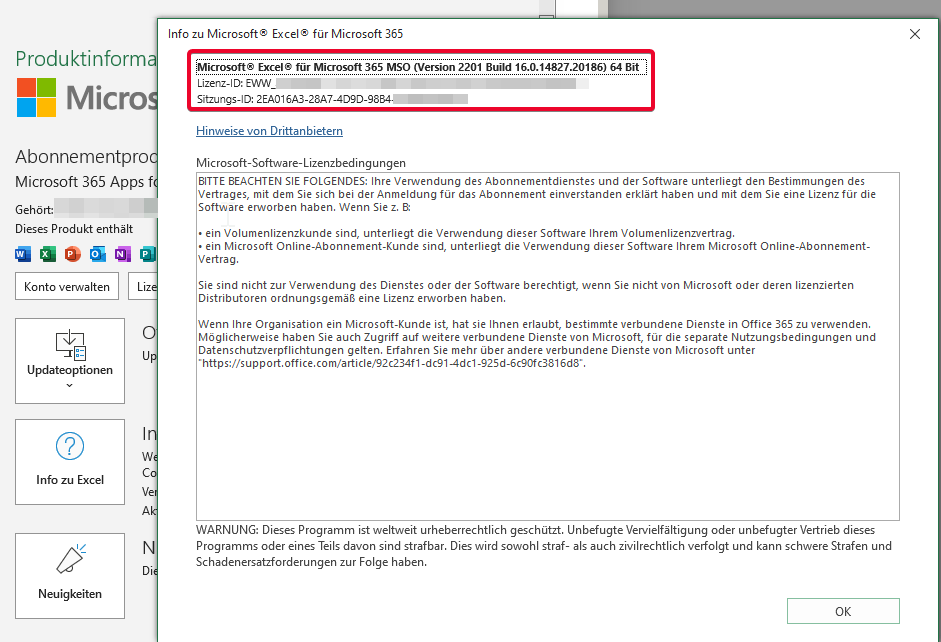
If you need more information, click on the button with the question mark Info about Excel.
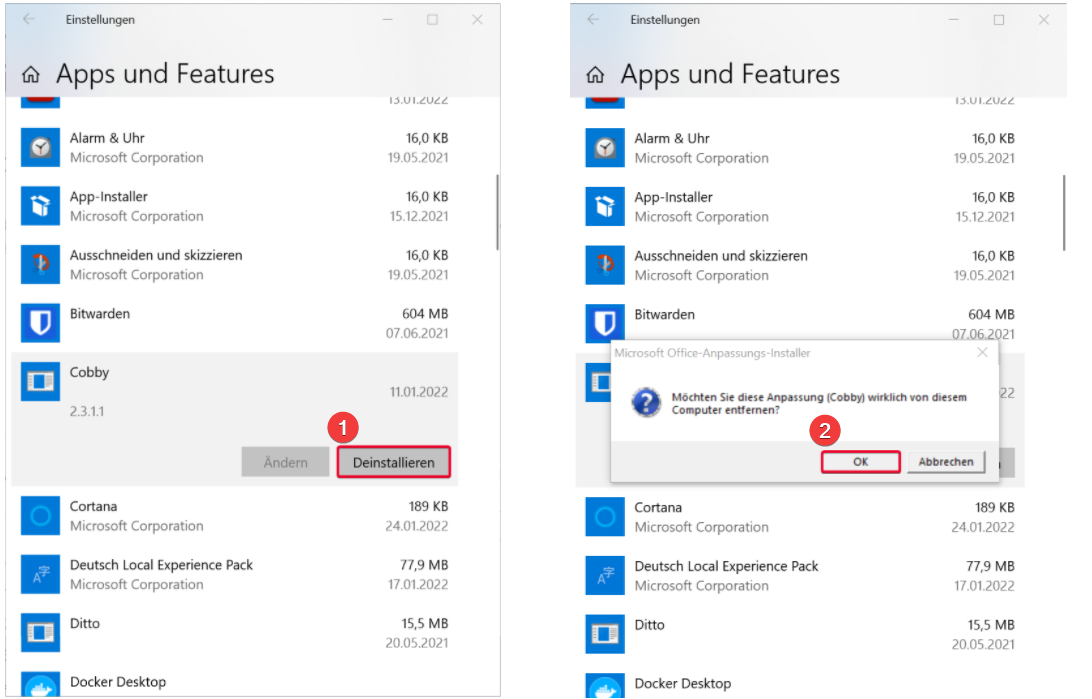
How can I uninstall cobby?
To change from cobby 1.0 to cobby 2.0 it is necessary to uninstall cobby completely once. In cobby 2.0 it is so that every newly created workspace gets an automatic license assignment.
To uninstall cobby 1.0, do the following:
- Open your local settings on your computer.
- Go to Apps → Apps and Features.
- Go to cobby uninstall.
Can I launch Excel without cobby?
Yes. Having installed several Excel add-ins can make your work more efficient, provided most of the add-ins are used on a daily basis. However, this is not always the case. If you want to know how to start Excel without any add-ins such as cobby, keep reading.
Why is it useful to launch Excel without add-ins?
Excel add-ins may cause Excel to launch significantly slower. Since most users do not work with all add-ins regularly, it can be smart to adjust the Excel settings accordingly. This way Excel does not have to launch all add-ins and thus starts much faster.
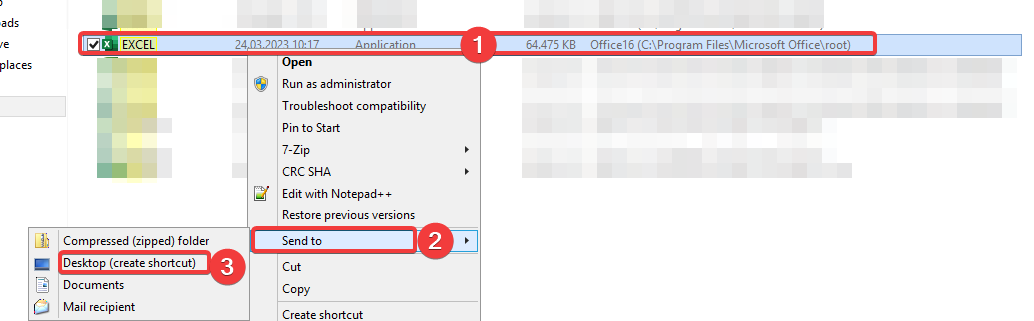
How to: Launch Excel without cobby or other add-ins
To launch Excel frequently without add-ins, please proceed as follows:
-
Launch the File Explorer, or Windows Explorer. Then search in the upperright corner for Excel.

-
Click the Type dropdown arrow in the Type column and check the Application box.

-
Right-click the application in the File Explorer and select Send to desktop (create shortcut) in the popup menu.
-
If you right-click on the shortcut, you can select Properties and then adjust the shortcut on your desktop.

Add " /s" at the end of the target path in the Target field in the Shortcut Properties dialog box.

-
Optional: In order not to mix up your Excel shortcuts, you can rename the new one without add-ins on your desktop.

Magento message "Integration not secure" - do I need to do something?
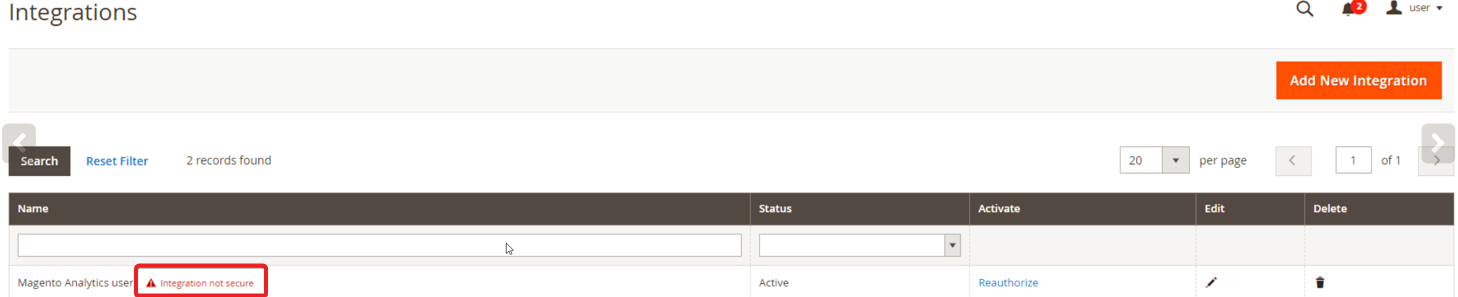
In short, no. This is perfectly normal and is not a problem, so you do not need to do anything else.
Magento has made a change for all versions from version 2.4 onwards, which should cause the connection to the integration to be made as automatically as possible. We have not yet developed this automatism for cobby, so the keys are entered manually. This manual input causes Magento to display the message "Integration not secure".
💡 You can read more about this change in Magento here in this Adobe Developer article.
Troubleshooting
Problems while installing the cobby add-in
If you receive an error message like this, please check the following:
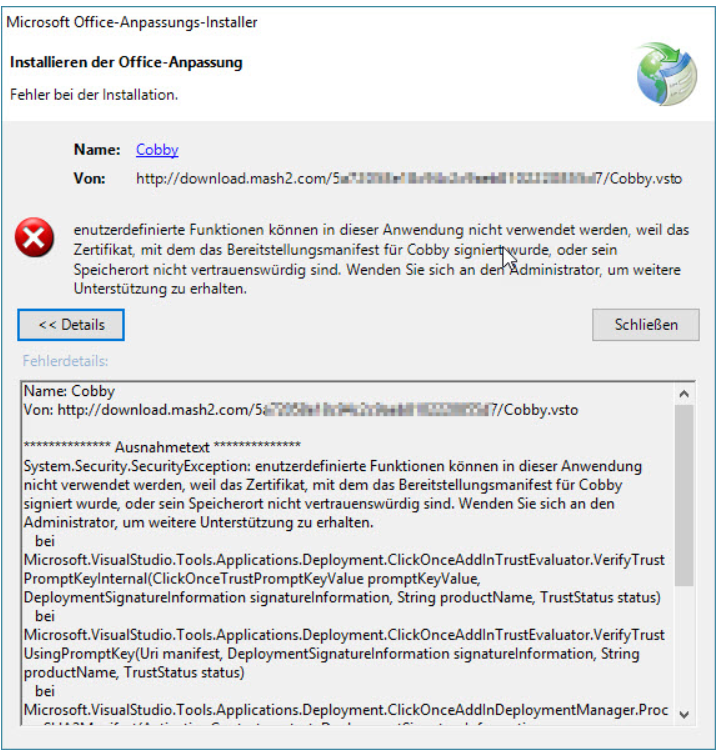
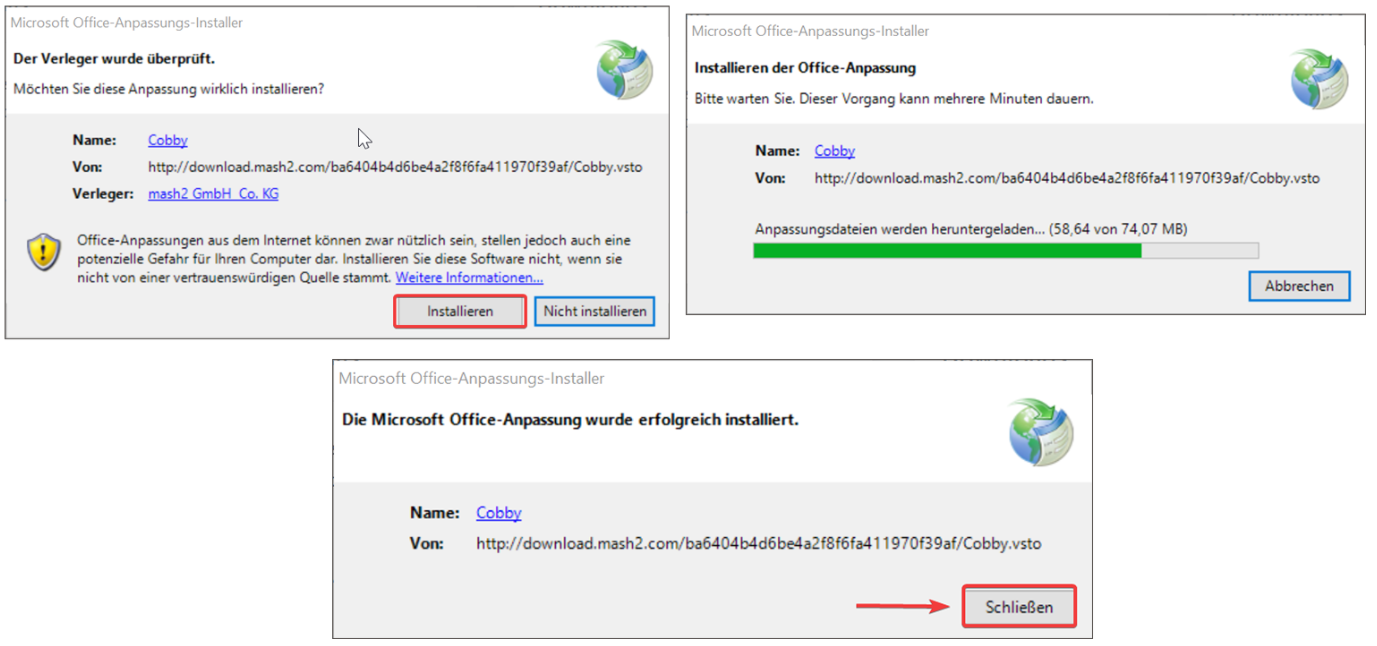
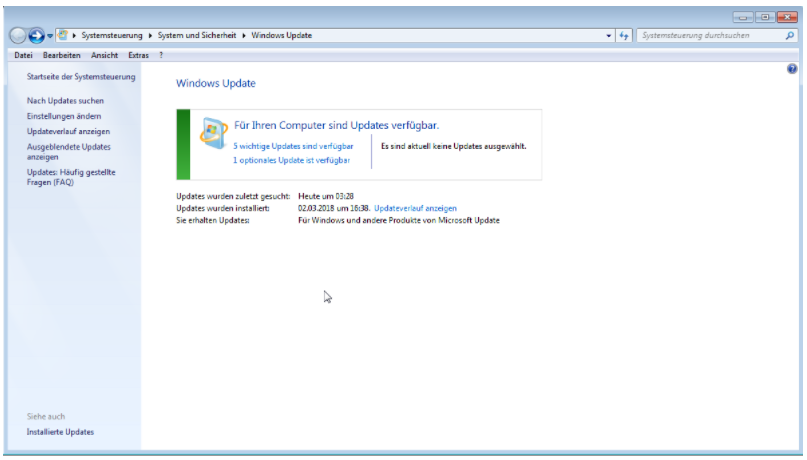
Make sure that all the latest Windows and Office updates have already been installed on your computer. The cobby installer accesses these files and needs the latest versions to run smoothly.
Click in your "Control Panel" on "System and Security ". There you will find the item "Windows Updates". Install the pending updates.
If the problem is still not solved after that, please install the Security certificate of the setup file in the Trust Center of Office. Proceed as follows:
- Right-click on the cobby installation file and select "Properties" and then the "Digital Signatures " tab.
- Mark here the entry "mash2 GmbH & Co. KG" and then click on "Details".
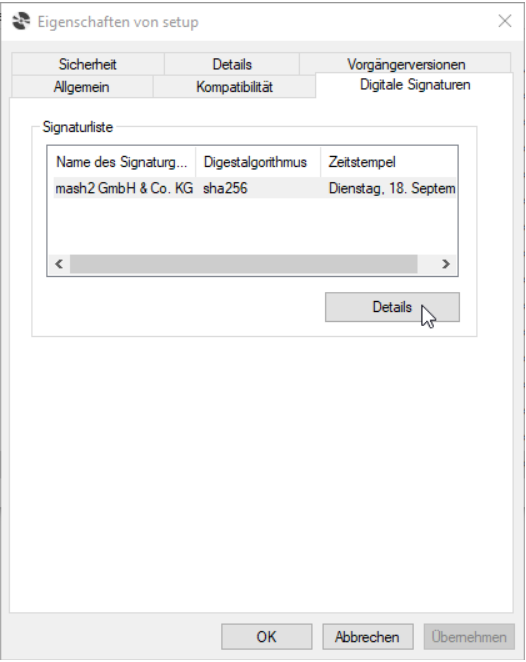
- In the "Digital signature details" window, select "Show certificate ".
- In the "Certificate" window select "Install Certificate " and follow the certificate import wizard.
- When asked for the certificate store, please select "Store all certificates in the following store " and select the entry "Trusted Issuers" via the "Browse" button. Confirm with "OK", then click on "Next" and then "Finish".
Things to consider when using Varnish
If you use Varnish, you have the option to enable or disable automatic flushing of the Varnish cache in the cobby settings of your Magento backend.
Auto-empty will only delete affected entries from the external cache. However, automatic emptying during saving can have a strong negative impact on the runtime of saving processes, especially if products are extensively linked or assigned to many categories.
We therefore recommend deactivating this setting for large catalogs.
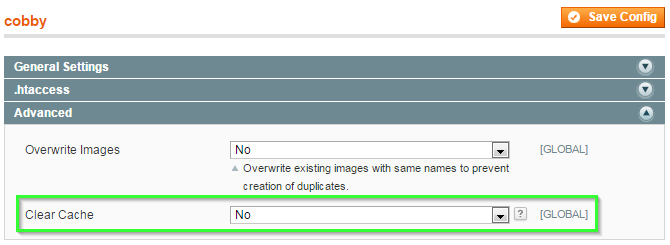
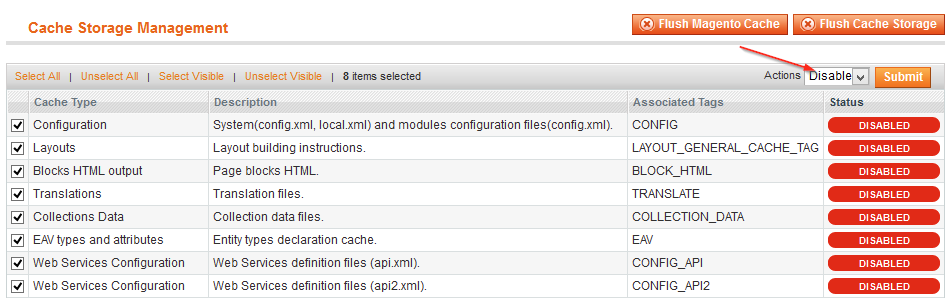
Flush Magento cache
You need administrator rights to perform this operation.
Procedure:
- Open the Magento backend.
- Navigate to System > Cache Management.
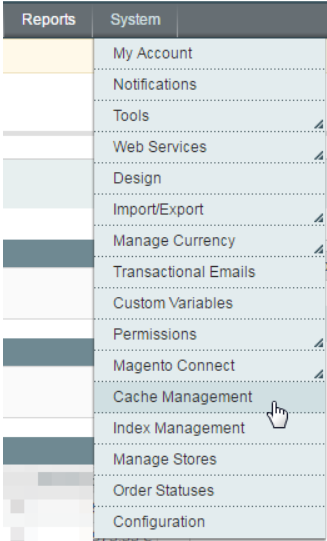
- Click Clear Magento Cache at the top right of the page.
![]()
- Save the cobby configuration.
cobby IP .htaccess Authentification
If a .htaccess protection has been enabled in Magento, the connection between cobby and Magento will not work. To work with an activated .htaccess protection, there are two variants to connect cobby with Magento.
Variant 1: IPs
Please store the following IP addresses for access from cobby:
- 94.130.132.59
- 144.76.175.234
- 148.251.124.208
- 138.201.195.175
- 78.46.90.150
- 138.201.83.227
Variant 2: API-Route hinzufügen
To make the connection to the API work despite active .htaccess protection, the default Magento API routes can be removed from the password protection.
- Magento 1: shopurl/index.php/api
- Magento 2: shopurl/rest/
More information about the implementation can be found here:
https://devdocs.magento.com/guides/v2.4/rest/bk-rest.html
Note: Once .htaccess protection is active, images cannot be viewed, downloaded or imported. In this case, the image preview will not be displayed correctly in the Task Pane.
In order for the images to be displayed and imported in the image preview, the .htaccess protection for the images must be removed. For this purpose, a rule can be created so that the folder media/import or all files with the extension .png or .gif .jpg are excluded from the protection.
Domain change in cobby
A domain change in cobby is generally possible. In this article you will learn what has to be considered.
Magento 2
The domain can be changed in the Magento backend in the following way. First log in to your Magento backend and proceed as follows:
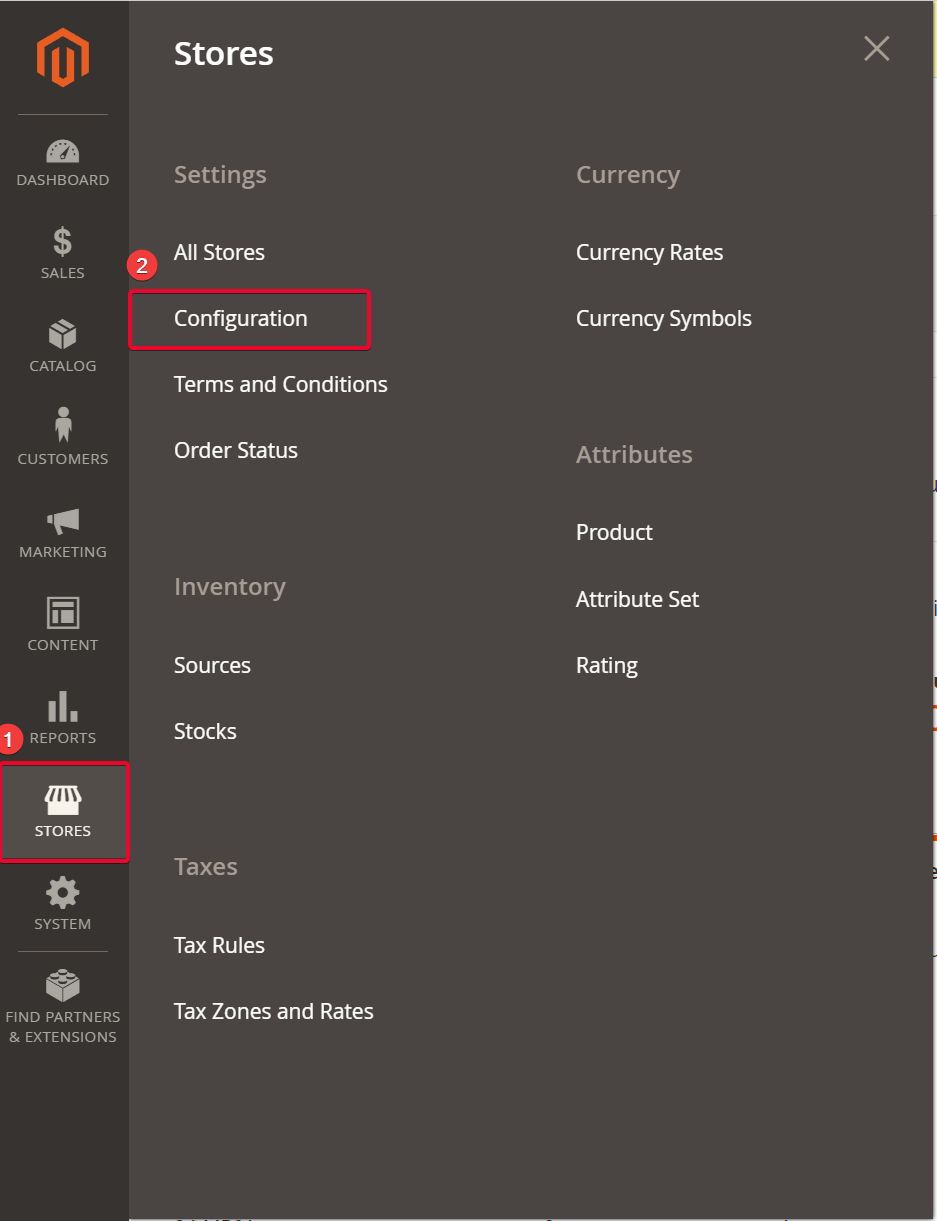
Step 1:
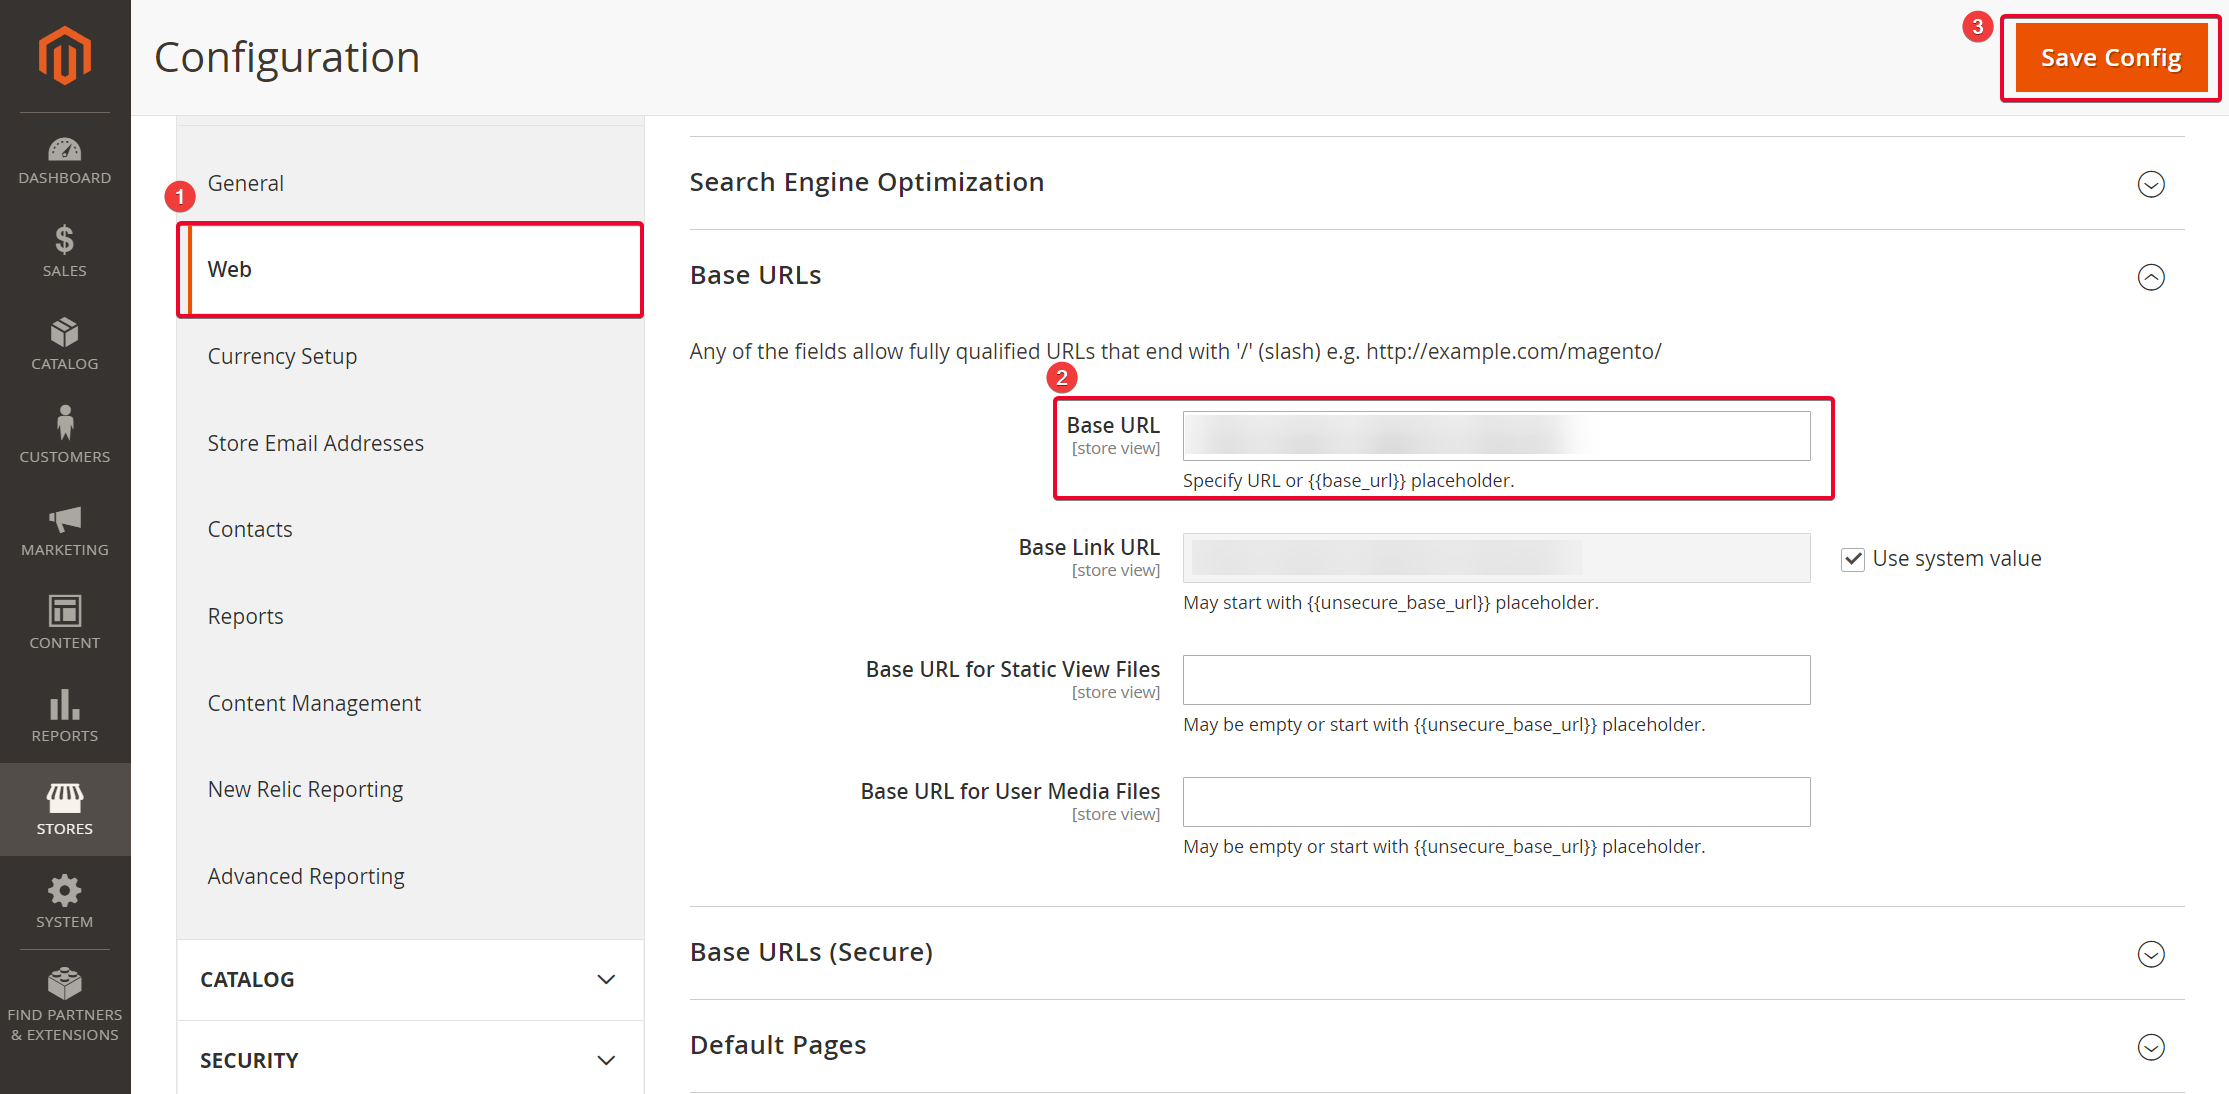
- Stores (1) → Configuration (2)
- Web (1) → Base URL (2) → Save Config (3)
cobby
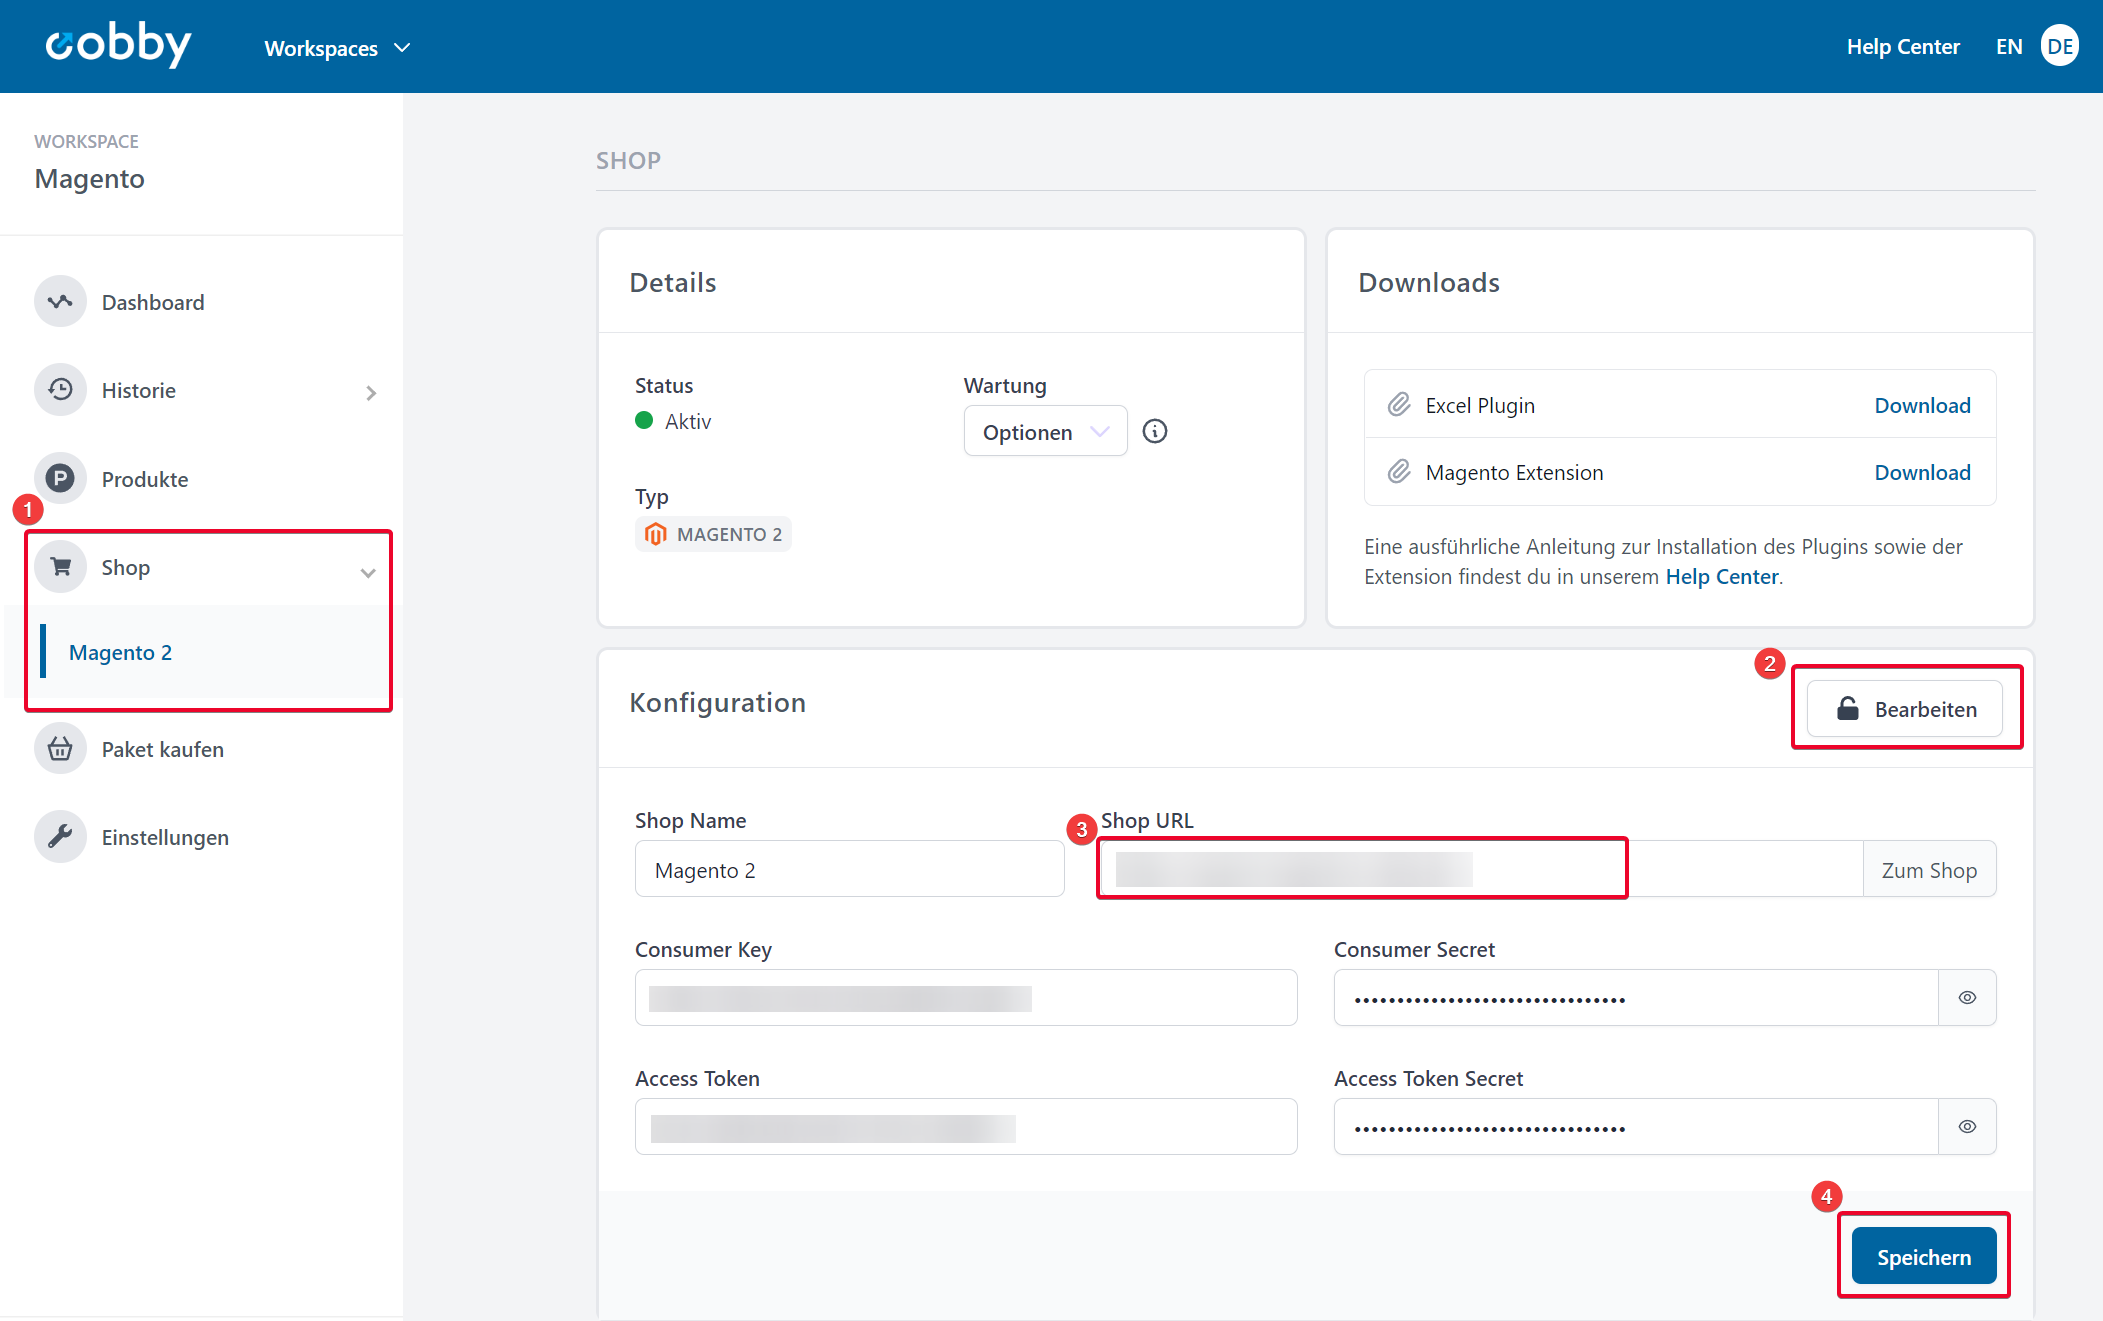
Now the new URL must be stored in the customer portal. Please do the following:
- Log in with your access data at https://app.cobby.io.
- Click on your workspace and go to Shop (1).
- Click on the "Edit" button (2) under Configuration to enter the new Shop URL (3).
- Click on "Save" (4).
Error message "Sorry, we couldn't find..."

If this error comes up, you can simply confirm it with "Ok". It occurs only once and only if you have uninstalled and then reinstalled cobby. After confirmation, close Excel and open it again. It should now work again.