Presets
What are presets?
Presets are frequently used (pre)settings that help to maintain data in the system faster.
With regard to product data maintenance in store systems with Excel, presets provide an already created view of the corresponding product data. When maintaining product data, it can happen that certain data is not relevant to the user and, in the case of large Excel folders, can be more of a nuisance than a help. With the help of a preset, a user can, for example, hide "unimportant" data and save this setting as a preset for the next processing. This does not only save time and nerves, but also makes data maintenance much clearer.
➡️ Haven't worked with cobby presets before?
In this article you will learn why working with presets is a useful practice.
🤓 You are an "old hand" and already know the presets?
A lot has changed over time: Did you know that you can now conveniently manage and edit the presets in the cobby portal? No more annoying scrolling back and forth in Excel tabs. Try it yourself! We'll also show you some useful tricks that will save you even more time when maintaining your products.
Presets in cobby
Default preset
- All attributes/columns are displayed.
It contains all attributes: both the self-created attributes and the default attributes of Magento.
Reduced preset
- The reduced preset is selected by cobby by default.
- Empty attributes/columns are hidden.
The reduced preset contains only system attributes and all user-defined attributes for which values are maintained in the products. Thus, the reduced preset is the default preset reduced by the attributes that are not currently used. For example, if the attribute "Size" has not been assigned to any product, the attribute will not be displayed in the reduced preset.
One advantage of this preset is the shorter loading times, since unnecessary columns do not have to be built up by Excel and recalculated during the editing phase. Another advantage is the clarity of the really used attributes, which is given by the reduced preset. If you are working on an attribute that has already been partially maintained or contains values, it is advantageous to load the reduced preset and use it for product maintenance.
Please note: If an attribute is to be newly added, the standard preset must be used, since only this preset contains all existing attributes.
Why are cobby presets useful?
As already mentioned, presets bring significant advantages for regular data maintenance.
Time saving
As we all know: Time is money. Especially in e-commerce, fast action and flexible product range expansions and updating can be decisive for competition.
The presets help you to avoid having to start from scratch with data maintenance - especially when it comes to routine tasks such as entering new prices or other product data. Save a customized workbook as a preset and simply use it again next time. No more re-customizing, no more moving columns back and forth and renaming them. By displaying only the attributes you want to edit, Excel loads faster and you can pick up where you left off more quickly.
💡 See also the tips and tricks in the section "Working with presets" to optimize your product data maintenance!
New interface: Manage presets web-based
Product data maintenance is now even more convenient thanks to the new preset management feature: From now on, you don't have to customize your presets in Excel anymore, but can do it comfortably web-based in the cobby portal. The times of moving columns back and forth or changing tabs in Excel (which can be a real test of patience with the amount of data in an online store) are now a thing of the past.
📌 Example:
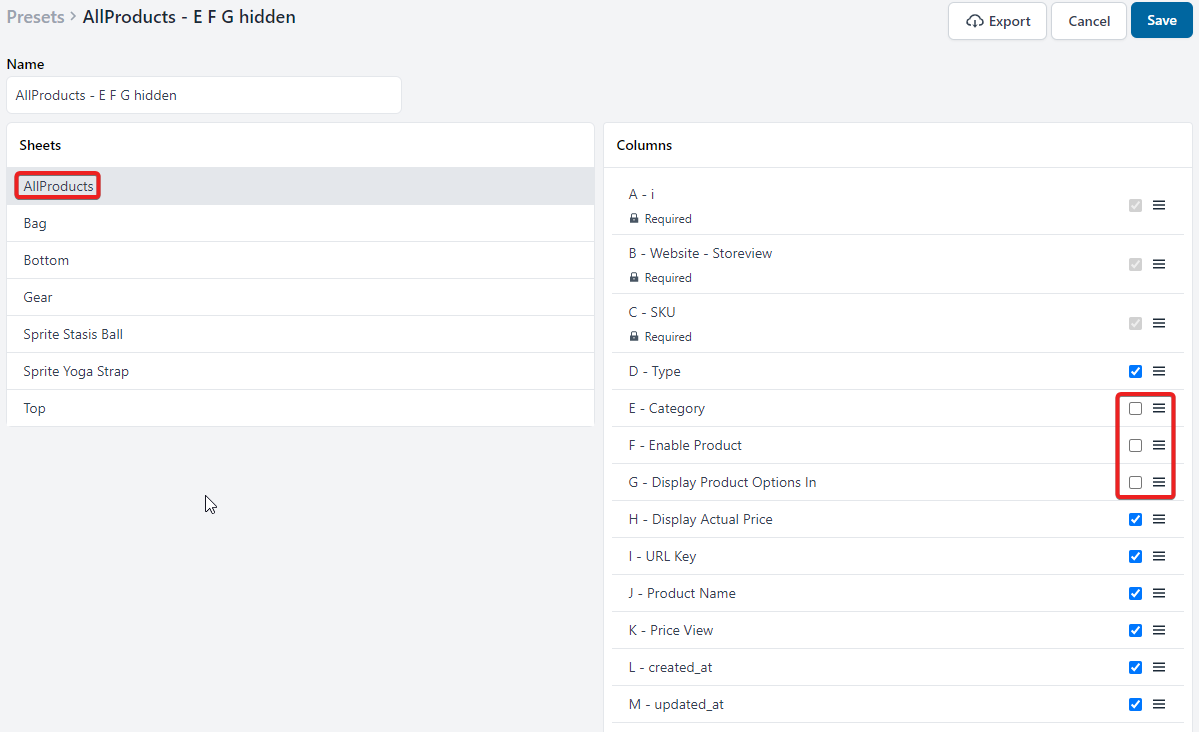
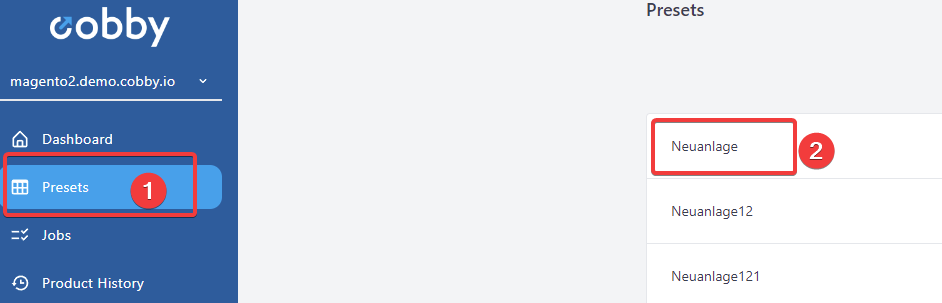
As soon as you have saved a preset in cobby Excel, it will appear in the cobby portal under the menu item "Presets".

📌 With a click on the white circle ("currently hidden") or the blue circle with checkmark ("currently visible") you can easily determine which columns you want to see or hide in your preset.
You can also change the order of the columns as you like by clicking on the three bars behind the visibility button and using drag & drop to place the respective column at the desired position.
📌 After saving the changes in the portal, Excel must be restarted once. Afterwards, you load your corresponding preset as usual and see directly the changes you have made in the portal.
Clarity
Another advantage is that you can hide those columns in the presets that are not relevant for your product data maintenance. This does not only result in shorter loading times, but also in a much clearer display of the product data in Excel, which makes a big difference when there are a lot of rows and columns. The preset management feature also ensures that the "thinned out" view in Excel appears even clearer in the cobby portal.
Working with presets
Create a preset
Custom presets can also be created using modifications to a standard or reduced preset. A custom preset can contain the following customizations:
- hide columns for presets
- rearranging columns in a preset
- help columns in cobby
- presets for product creation
A custom preset can include different customizations for each individual attribute set sheet or customizations for Allproducts only.
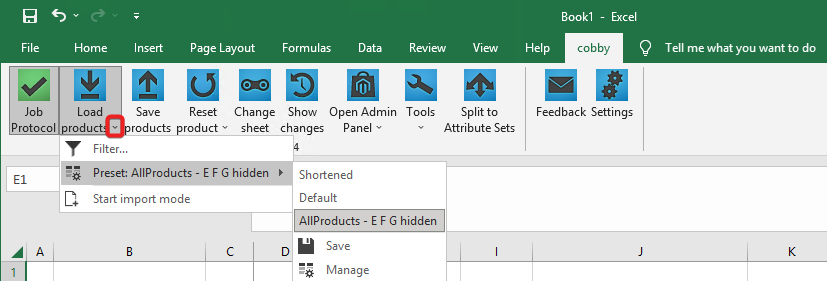
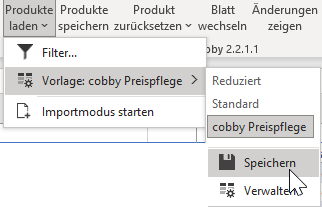
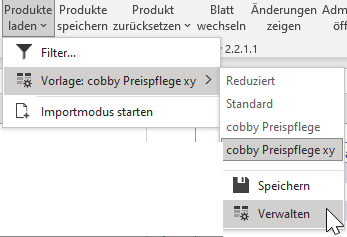
Save a preset in Excel by clicking on the little arrow under the "Load products" button. Then go to Preset and click on "Save". If the preset has been saved, it will be listed here under the Default preset for reapplication.
How to: Hide columns for presets
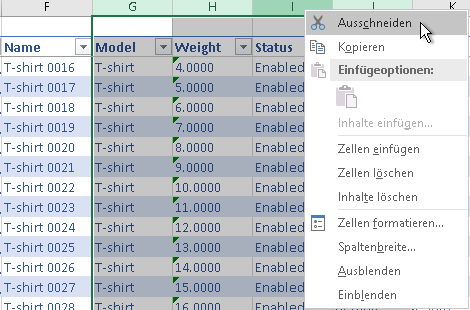
1. Mark column header
Select a column header with a right click. To hide multiple columns, you must first select multiple columns. To do this, hold down the Shift key and select other column headers by clicking on them.
2. Move columns
Move the columns to the end of the table. To do this, right-click and choose "Cut".
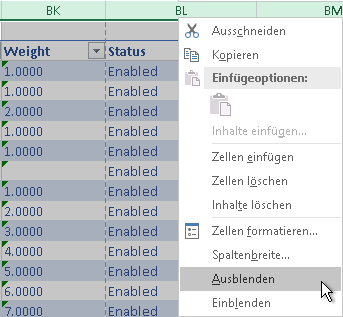
3. Paste cut cells
Scroll to the (right) end of the table, right-click in the first cell of the first column outside the table and choose "Paste cut cells".

4. Hide
Now select "Hide".
Please note: When creating new products/data, mandatory fields must be specified and must not be hidden, otherwise Magento will refuse the import.
How to: Rearrange columns in a preset
Scenario: You want to create a preset where the important columns, or the columns you want to edit, are all right at the top of the table so you don't have to keep scrolling back and forth while editing.
Solution: Cut out the columns, paste them at the front and save this arrangement as a preset.
1. Mark columns
Select the column you want to move by clicking on the column header. If you want to reorder multiple columns, hold down the Shift key and select more columns by clicking on the column header.
Please note: Only columns that are directly next to each other can be moved together (in one step). For columns that are found at different positions in the table, the marking step and the subsequent steps must be performed again.
2. Cut columns
Right-click on the column header and choose "Cut".

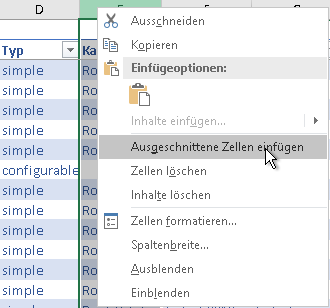
3. Insert columns
Right-click the column next to which you want to place the cut columns and select "Paste cut cells". The columns will always be pasted to the left of the selected column.
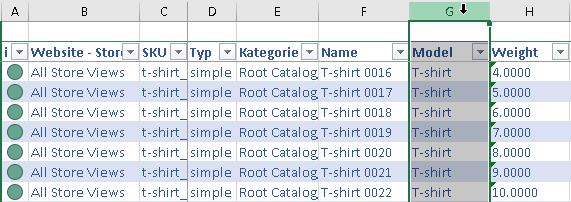
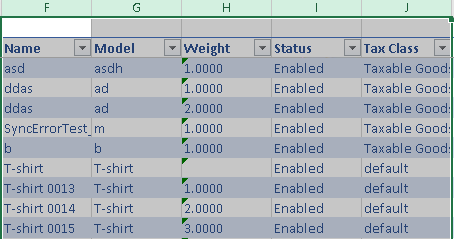
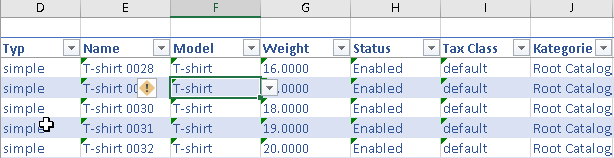
Now we have moved our columns (Name, Model Weight, Status, Tax Class) directly behind the Type column. If you want to rearrange multiple columns, just repeat steps 1-3.
The result:
Help columns in cobby
What are help columns?
Help columns are extra columns that can be added to tables without becoming part of the product data. They are used to organize and clarify workflows. For example, you can use texts in help columns to create a single task template for a translation. With the help of a yellow "Start" and "Stop" help column, you can signal to the "Translator" which columns should be edited and which can be ignored.

Likewise, you can use not only texts but also formulas in help columns. More complex functions/formulas can be divided into several help columns, so that more extensive tasks can be presented in a more comprehensible "step-by-step" manner.
Unlike other columns, the column headers of the help columns are highlighted in yellow and can therefore be differentiated from attribute columns at any time. Help columns can be saved in templates for repeated use, but can also be used once at any time.
Please note: Help columns exist only in cobby presets or in the currently loaded Excel sheet. They are not part of the product data and are not displayed in Magento. Help columns are highlighted in yellow compared to attribute columns, so that you can differentiate between them.
Create help columns

- Go to the column header to the right of the position where you want to add the new column. Your cursor will turn into a downward pointing black arrow.
- Click on the column header and the entire column will be selected.
- Right-click on the column and select "Insert". A help column will appear to the left of the initial column.
- If the new column is in the desired location, you are done. If not, you can always move it to another place.
Data validation
When a help column is created, the type of the column is copied from the neighboring column on the right. If the initial column had data validations, they are also copied to the newly created column. Data validation prevents data from being entered for an attribute that is unsuitable.
You can avoid this behavior in two ways:
- Create a help column wherever you want and disable data validation for these help columns. See: disable Data Validation
- Change Excel's default behavior to not copy the style of neighboring cells.
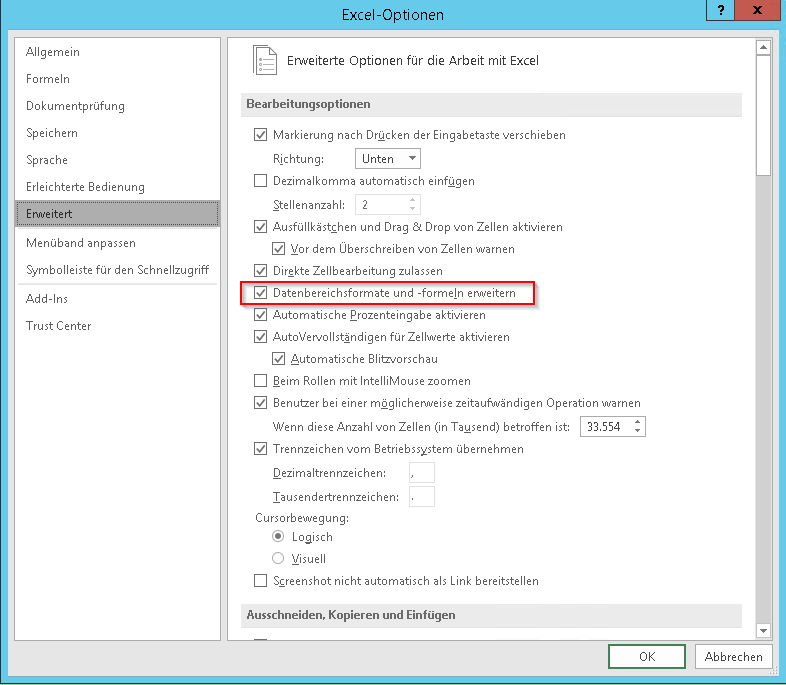
- Navigate to File > Options > Advanced.
- Remove the checkmark from Expand data range formats and formulas.
Saving formulas in help columns
For existing products:
- Since only the first row for all existing products is stored in a table, create your formula in the first row of the table.
- For a later application of the formula to all products of the table make a double click on the lower right corner of the cell. The cursor will look like a ➕ when the correct corner is clicked.
How to: Presets for product creation
Example:
- Add a new row to the table as if you were creating a new product.
- Enter formulas instead of product data: For example, enter a formula that creates a description from other attributes.

- Save it as a preset.
- If you load this preset and add a new row, the description will be automatically filled with the data of the other attributes.
How to: Change loaded preset
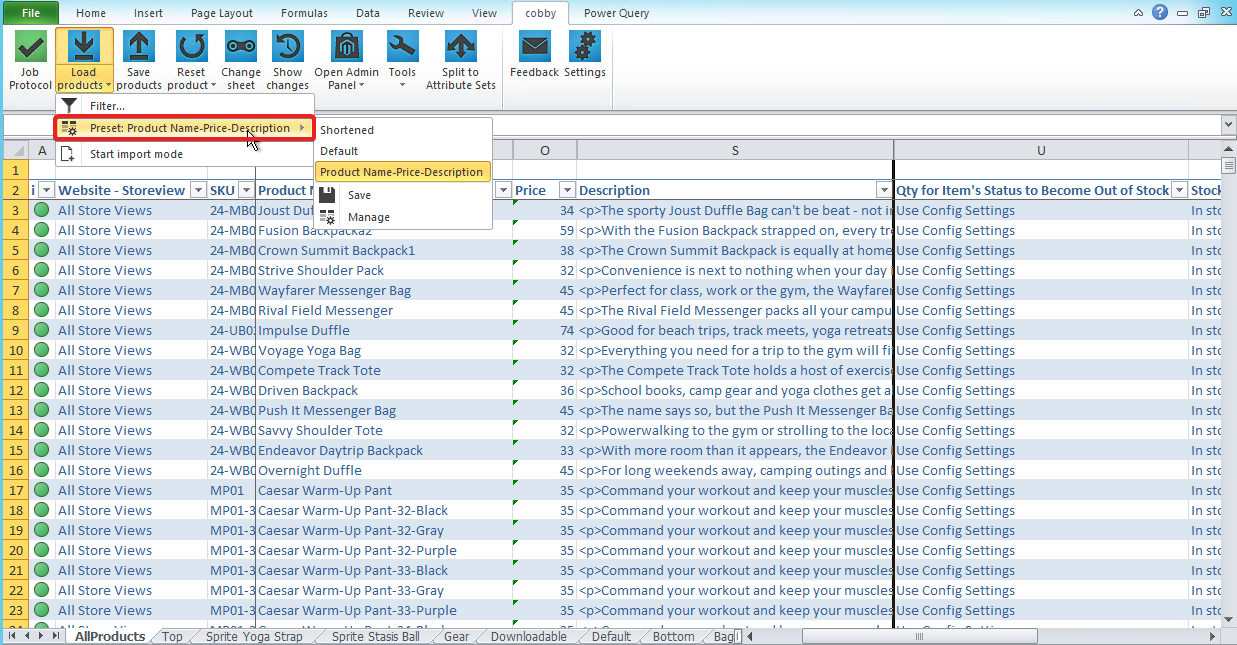
The Load Products button has two functions. On the one hand all products are loaded, on the other hand the lower part offers a menu to change the currently loaded preset.
Step 1: To switch from the loaded preset to another one, click on the bottom part of Load Products and select another preset.
Step 2: The products are then reloaded.
FAQs
You have a question about presets? Maybe you will already find the answer here.
When creating a preset, do you always have to start at Standard or Reduced?
No, presets can build on each other. Example: You already have a preset with the name cobby price maintenance and want to add a field to it for the next year. You load the existing preset and make the change. Then you navigate to "Preset: ... -> Save" and name the preset price maintenance xy.
Step 1: When all the changes are made, click Save.
Step 2: Give your new preset a unique name and finish the dialog by clicking Save.

Can I modify an existing preset?
Yes, existing presets can be overwritten using the new feature in cobby 2.0.
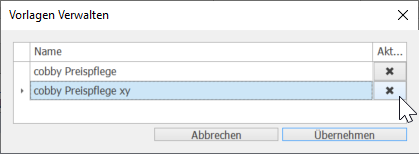
How do I delete an existing preset?
Step 1: Navigate to the menu item Manage.
Step 2: Click the X next to the preset to remove it and confirm the deletion by clicking Apply.
Why are my presets not displayed in the cobby portal, although they are visible in Excel?
Probably you cannot see the presets in the portal because you have not created your own presets in Excel yet. The default presets, i.e. the reduced and the default preset, are predefined by cobby and are not displayed in the portal.
Can I import or export presets?
Yes, this is possible. For example, if you have two licenses/workspaces, but you don't want to keep redoing the presets, you can export them from one workspace and import them into the other.
-
To do this, go to your live license in Presets in the portal and select a preset.
-
Then a new window will open. Click here on "Export".

-
If you have downloaded both preset exports, go into your staging license and back to Presets and upload the presets here.
