Import mode
The import mode is a very helpful function of cobby. It should be used whenever external data is maintained in the store.
For example, if you want to update existing products with new manufacturer data or create new products, use the import mode. Likewise, if you want to transfer products or data from Stage to your live system, use the import mode (you can see this case here). In import mode no store products are loaded. You will only see all attribute sets and all associated attributes.
During the import, cobby compares the products in the store with the products in the Excel workbook. For this, cobby identifies the respective product in the store via the sku and compares each attribute value. If the attribute values in the store are the same as those in Excel, nothing happens. If the values differ, however, they are imported from Excel directly into the store and thus updated. In general, if the values in the store and Excel are not the same, all store values will be overwritten by the data in the workbook. All attributes that you do not want to take over, where the data in the store is correct and should not be updated by the Excel data, you can hide. Everything that is hidden will not be taken into account by cobby, thus will not be matched and will keep the value that is already in the store.
Procedure for creating and updating product data using the import mode
Step 1: Load data into Excel workbook
Load the customer data in an Excel workbook and format the data as a table (key combination: Ctrl & A → Ctrl & L). Close all other Excel workbooks afterwards.
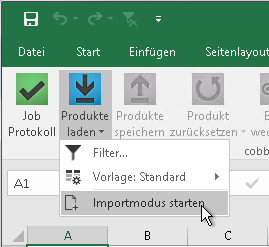
Step 2: Start import mode
Select the standard template via the menu at "Load products" and start the import mode.
Step 3: Select attribute set
Select an attribute set that contains all columns to be imported. (Since the import mode does not know "All Products", ignores the used attribute set and imports only the displayed data identified by the sku, it does not matter which attribute is chosen.)
Please note: When creating a new product, the products must not simply be matched in any attribute set. In this case, they must be created in the exact attribute set in which they are to be found later.
Step 4: Hide unused columns
You can hide all columns/attributes that you do not want to maintain or for which you have no new or only obsolete data. To do this, first move all columns to the front, behind the Website and Sku columns, using "Cut Column" and "Paste Cut Columns". Then select all remaining columns, right-click on the column header and click on "Hide".
If you forget to hide columns, "empty" columns or outdated data will be imported and the data already in the store will be overwritten.
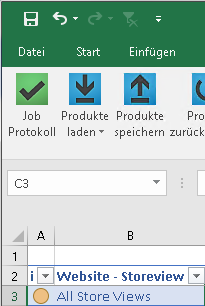
Step 5: Keep Website and SKU columns displayed
The columns Website and SKU must always be shown and also filled, since these two columns provide the identification of the product and thus the correct assignment with the import.
Please note: When creating a new product, all mandatory fields must be filled and displayed in addition to the Website and SKU.
Step 6: Sort columns and copy data
Now sort the columns in their manufacturer list equivalent to the arrangement in the attribute set. Then mark and copy the data and paste it at the right place in the cobby sheet. Make sure that the column headers are not copied from the manufacturer data.
Note: When creating new products, use the "Split to Attributeset" function, which assigns the products to the assigned attribute set.
Step 7: Save → Start import
Finally, click on "Save products" to start the import. During the import, you will only receive feedback via the job log. This turns green when the process is finished, whereas the product statuses remain yellow even after the process is finished.
Step 8: Close and reopen Excel
After working in import mode, please close Excel and open a new Excel folder to continue working with cobby.