How to Use Import Mode
Learn how to use cobby's import mode to efficiently create new products or update existing products with external data from manufacturers, suppliers, or other systems.
When to Use Import Mode
Use import mode when you need to:
- Update existing products with new manufacturer data
- Create new products from external data sources
- Transfer products from staging to live environment
- Import supplier product information
Import mode is optimized for bulk data operations. Unlike normal mode, it doesn't load existing product data from your store - only the attribute structure. This makes it much faster for large imports.
How Import Mode Works
Understanding how import mode processes your data is essential to avoid common pitfalls.
The Matching Process
When you save products in import mode, cobby:
- Identifies each product by SKU - The SKU in your Excel sheet is matched against existing products in your store
- Compares each attribute value - For every visible column, cobby checks if the Excel value differs from the store value
- Overwrites differing values - Any difference results in the Excel value replacing the store value
| Excel Value | Store Value | Result |
|---|---|---|
| "Red" | "Red" | No change |
| "Blue" | "Red" | Store updated to "Blue" |
| (empty) | "Red" | Store cleared! ⚠️ |
| "Green" | (column hidden) | No change (column ignored) |
Column Visibility Controls Everything
Hidden columns are completely ignored - cobby won't read or write any data in hidden columns, regardless of what's in your Excel sheet.
This leads to two common problems:
- Data not updating: You want to import data, but the target column is hidden → Nothing happens
- Data accidentally deleted: You leave an empty column visible → Empty values overwrite your store data
Remember: Visible = Will be imported. Hidden = Will be ignored.
Prerequisites
Before starting, ensure you have:
- cobby installed and connected to your shop
- An Excel file with product data (SKU column required)
- For new products: all mandatory fields prepared
- For multi-shop imports: access to the target license
Step-by-Step Guide
Step 1: Prepare Your Import File
- Open your external data (manufacturer list, supplier data, etc.) in Excel
- Structure your data with columns matching cobby attribute names
- Ensure SKUs are in a dedicated column
- Format the data as a table: Ctrl + A → Ctrl + L
- Save this file
Keep your import file simple - only include the columns you actually need to update. This makes it easier to manage column visibility later.
Step 2: Close Other Workbooks
Close all other Excel workbooks before starting import mode. Having multiple workbooks open can cause performance issues or conflicts.
Step 3: Start Import Mode
- Open cobby in Excel
- Click "Load Products" in the ribbon
- Select "Start Import Mode"
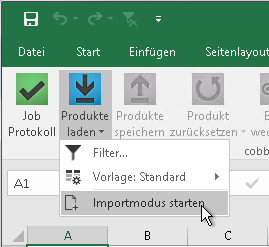
What happens: cobby creates a new sheet showing all available columns from your attribute sets, but without loading any product data from your store.
Step 4: Select Attribute Set
Choose an attribute set that contains all the columns you need to import.
For updating existing products: Since import mode matches products by SKU, you can choose any attribute set that has the required columns. The attribute set selection doesn't affect which products get updated.
For new products: You must select the exact attribute set where the products should be created. New products will be assigned to the attribute set you select here.
Step 5: Configure Column Visibility
This is the most critical step for a successful import.
Take time to carefully review which columns are visible. Every visible column will be processed during import:
- Visible + has data → Data will be imported
- Visible + empty → Existing store data will be deleted
- Hidden → Column is completely ignored
5a. Unhide columns you want to import
- Check if the columns you need are currently visible
- If any required columns are hidden, right-click and select "Unhide"
- Verify all target columns are now visible
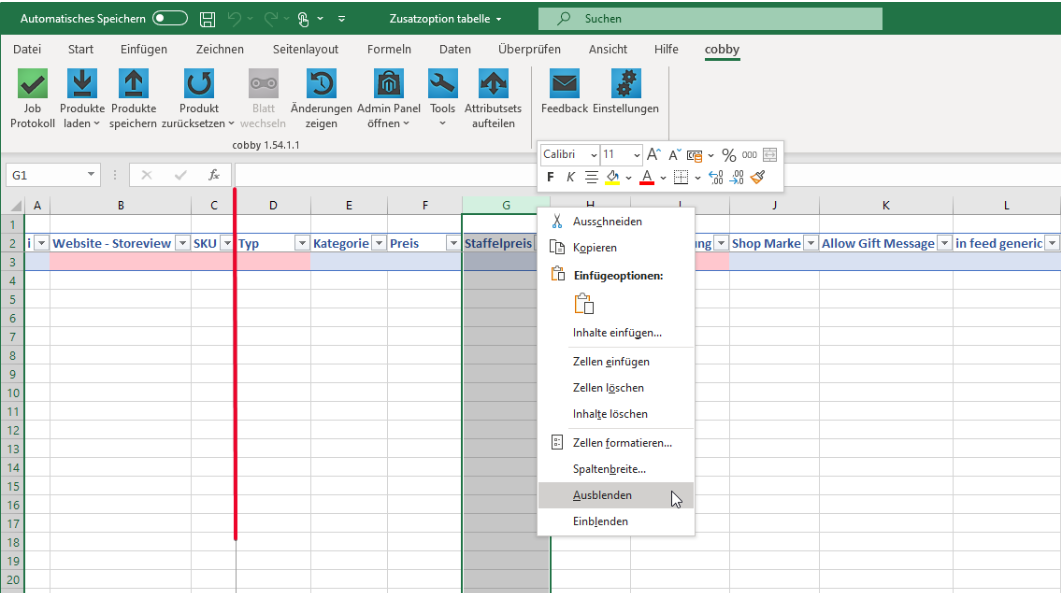
5b. Hide columns you DON'T want to import
- Identify columns where you have no new data or where the store data should remain unchanged
- Move columns you want to keep to the front (behind Website and SKU):
- Right-click on column header → "Cut Column"
- Navigate to desired position → "Paste Cut Columns"
- Select all remaining columns you want to exclude
- Right-click → "Hide"
Step 6: Keep Required Columns Visible
Always keep these columns visible and filled:
| Column | Purpose |
|---|---|
| Website | Identifies which store/website the product belongs to |
| SKU | Unique product identifier for matching |
Manually type values into the "Website Storeview" field - do not copy-paste. Copy-pasted values in this field may not be saved correctly due to formatting issues.
For new products: Additionally keep all mandatory fields visible:
- Name
- Price
- Status
- Visibility
- Tax Class
- (and any other fields required by your shop)
Step 7: Copy Your Data
- Switch to your import data file
- Select the data you want to import (without column headers)
- Copy the data (Ctrl + C)
- Switch back to the cobby import sheet
- Paste into the corresponding columns (Ctrl + V)
Do not copy column headers from your source file - only copy the data rows. Column headers in cobby must remain unchanged.
For new products: After pasting, use the "Split to Attributeset" function to assign products to their correct attribute set.
Step 8: Save to Start Import
- Click "Save products" in the cobby ribbon
- Watch the job log indicator in the status bar
- Wait until the job log turns green (import complete)
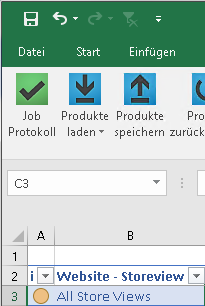
The product status column (far left) may remain yellow after import - this is normal behavior for import mode. The yellow status indicates the row was processed but doesn't indicate success or failure.
Step 9: Close and Reopen Excel
After completing your import:
- Close Excel completely
- Open a new Excel workbook
- You can now continue with regular cobby operations
Troubleshooting
Data Not Updating
If your import completes successfully (green job log) but store data hasn't changed, hidden columns are almost always the cause.
Why this happens:
cobby only processes visible columns. If a column is hidden in your attribute set, cobby completely ignores it - even if your Excel file contains valid data for that column.
Real-world example:
A customer wanted to update shoe sizes in their "Shoes" attribute set. They prepared an Excel file with all the correct data and ran the import. The job log showed success, but when they checked the store, nothing had changed.
The cause: The "Size" column had been hidden in the "Shoes" attribute set months ago because they didn't need it at the time. They forgot it was hidden, and cobby silently ignored all the size data.
The fix: Unhide the "Size" column and re-run the import.
How to diagnose:
- Open the attribute set you used for import
- Check if the target column is visible or hidden
- If hidden, unhide it and re-run the import
Quick checklist:
- Is the target column visible (not hidden)?
- Are you using the correct attribute set?
- Do SKUs match exactly (case-sensitive)?
Store Data Accidentally Deleted
Symptom: After import, some product fields are now empty that weren't empty before.
Why this happens:
You left columns visible that had empty cells in your import file. Empty cells = empty values = store data gets overwritten with nothing.
Example:
- Your import file only had SKU, Name, and Price columns with data
- But you forgot to hide the Description column
- Description column was empty in your import file
- Result: All product descriptions in your store are now empty
How to prevent:
- Always hide columns where you don't have new data
- Review all visible columns before clicking Save
- When in doubt, hide the column
Data Imported to Wrong Products
Symptom: Product data appears on the wrong products after import.
Why this happens:
SKU mismatch or incorrect column alignment during copy-paste.
Common causes:
- SKUs don't match exactly (case-sensitive!)
- Data was pasted into the wrong column
- Rows got shifted during copy-paste
SKU matching rules:
| Your Excel | Store | Match? |
|---|---|---|
ABC-123 | ABC-123 | ✅ Yes |
abc-123 | ABC-123 | ❌ No (case differs) |
ABC-123 | ABC-123 | ❌ No (trailing space) |
ABC-123 | ABC-123 | ❌ No (leading space) |
Other Common Issues
Products aren't being created
- Verify you're in Import Mode (not normal mode)
- Ensure all mandatory fields are filled (SKU, Name, Price, Status, Visibility, Tax Class)
- Check that you selected the correct attribute set for new products
- Verify the Website column is filled correctly
Website Storeview not saving
Type the Website Storeview value manually instead of copy-pasting. Copy-pasted values may contain hidden formatting that prevents saving.
Job log shows errors
Check the job log details for specific error messages. Common issues:
- Missing mandatory fields
- Invalid attribute values (e.g., wrong dropdown option)
- Duplicate SKUs
- Data type mismatches
See Error Codes Reference for solutions.
New products in wrong attribute set
For new products, you must select the exact target attribute set before importing. If products ended up in the wrong set, you'll need to delete them and re-import with the correct attribute set selected.
Excel crashes or becomes slow
- Close all other Excel workbooks before starting import mode
- If importing large datasets, consider splitting into smaller batches
- Ensure your computer has sufficient RAM available
Best Practices
Before every import, verify:
- ✅ All target columns are visible in the attribute set
- ✅ All columns without new data are hidden
- ✅ Website and SKU columns are filled correctly
- ✅ SKUs match exactly (case-sensitive)
- ✅ Website Storeview was typed manually (not pasted)
Related Info
- Store Views - Understanding how Store Views work and the Website-Storeview field
- Fix Import Data Not Updating - Detailed troubleshooting guide
- Error Codes Reference - Complete list of error codes and solutions
- How to Show Hidden Columns - Managing column visibility