Onboarding: Introduction to cobby
Welcome! In this comprehensive onboarding tutorial, you'll discover what cobby is, learn both the Portal and Excel interfaces, and successfully update your first product. By the end, you'll understand how cobby transforms product management from a tedious task into an efficient workflow.
If you prefer a quick start (10-15 minutes), try our Quick Start tutorial for your platform first, then return here for the complete picture:
What You'll Learn
In this tutorial, you will:
- Understand what cobby does and why it exists
- Connect to your shop and explore the cobby Portal's administrative features
- Navigate the Excel interface and discover its powerful capabilities
- Load products from your shop and understand how data is organized
- Edit product information using Excel's familiar tools
- Save your changes back to your online shop
- Understand the distinct roles of Excel (operational) and the Portal (administrative)
Time to complete: About 20-25 minutes
What you'll build: You'll complete your first real product update, changing product information and successfully syncing it to your live shop.
Prerequisites
Before starting this tutorial, you need:
- A Magento or Shopware store with the cobby extension installed
- Microsoft Excel installed on your computer (Windows or Mac)
- The cobby Excel add-in installed
- A cobby account with valid credentials
- At least one product in your store to edit
If you haven't installed cobby yet, check our installation guides:
Part 1: Understanding What cobby Does
The Problem cobby Solves
Imagine you need to update prices for 500 products, add descriptions to 200 items, or reorganize your entire category structure. In Magento or Shopware's admin panel, you would:
- Open each product individually
- Wait for the page to load
- Find the correct field
- Make your change
- Save and wait again
- Repeat hundreds of times
This is time-consuming and frustrating.
What cobby Does Differently
cobby brings all your product data into Microsoft Excel, where you can:
- See hundreds of products at once in a familiar spreadsheet
- Edit multiple products simultaneously using copy-paste, fill-down, and formulas
- Use Excel's powerful features like filters, search, and conditional formatting
- Work offline and save changes when ready
- Collaborate with team members who can work on different products at the same time
The result: Tasks that took hours now take minutes.
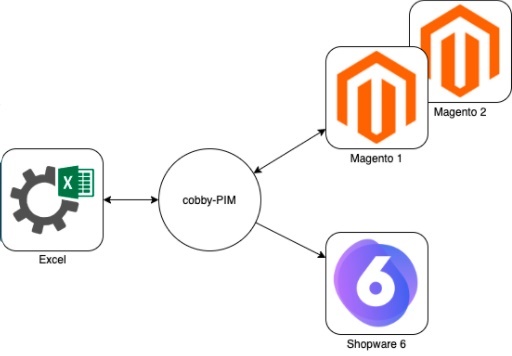
cobby's Two-Interface Architecture
cobby provides two distinct interfaces, each designed for a specific purpose:
cobby Portal (Administrative Interface):
- Connect your shop(s)
- Download plugins
- Manage users and permissions
- Monitor job history and product changes
- Configure workspace settings
cobby Excel (Operational Interface):
- View all your product data in a familiar spreadsheet
- Load, edit, and save product data
- Use Excel's powerful features for bulk operations
- Work with custom formulas and functions
How It Works (Simplified)
- Load: cobby fetches product data from your shop into Excel
- Edit: You make changes in Excel using familiar spreadsheet tools
- Save: cobby sends only your changes back to the shop
All changes sync in real-time, and you always see the current state of your products.
Part 2: Connecting and Exploring the cobby Portal
The cobby Portal is the web-based administrative dashboard where you manage your workspace, users, and settings. Let's explore it first before working in Excel.
Step 1: Log In to the cobby Portal
- Open your web browser
- Go to https://customer.cobby.io
- Enter your email address and password
- Click "Sign In"
What you'll see: The cobby Portal dashboard with your workspace information.
Step 2: Explore Your Workspace
The Portal displays:
- Workspace name: Your company or project name
- Connected shop: Your Magento or Shopware store URL
- Active users: Team members with access to this workspace
- Subscription status: Your current plan and billing information
What is a workspace? A workspace represents one connected shop. If you manage multiple shops, you'll have multiple workspaces.
Step 3: Navigate the Portal Sections
Let's tour the main areas of the Portal. Click through each section in the left navigation:
Dashboard:
- Overview of your workspace
- Quick access to common tasks
- Connection status at a glance
Presets:
- View custom column configurations
- Create new presets for specific workflows
- Share presets across your team
Jobs:
- Monitor active and completed background tasks
- Track product synchronization operations
- Review job status and completion times
Product Updates:
- Overview of product modification history
- Filter by SKU, date, or user
- See who changed what and when
Settings: The Settings menu contains several important subsections:
-
Workspace Settings:
- Manage workspace name and general configuration
- Set default preferences
- Configure timezone and locale
-
Shop Settings:
- Monitor your shop connection status (Connected/Disconnected)
- Download the cobby plugin for your platform
- Verify connectivity with a test connection
- Execute full resynchronization when needed
- Update shop credentials if they change
-
Updates:
- View available plugin and add-in updates
- Review update history
- Schedule maintenance windows
-
Users:
- Add team members to your workspace
- Assign permission levels (Admin, Editor, Viewer)
- Remove users when access is no longer needed
-
Billing:
- View your subscription plan
- Update payment methods
- Review invoice history

Step 4: Check Your Connection Status
Connection status is critical for cobby to function:
- Navigate to Settings > Shop
- Look for the "Connection Status" indicator
- Verify it shows "Connected" with a green indicator
- Check the last sync time to confirm recent communication
What you'll see: A status screen showing your shop URL, connection state, and when cobby last communicated with your store.
If your connection status shows "Disconnected" or has errors, check our troubleshooting guide before continuing. The Portal's Shop Settings page includes a "Test Connection" button to diagnose issues.
Step 5: Review Team Members (Optional)
- Click Settings > Users in the navigation
- See who has access to this workspace
- Note their permission levels (Admin, Editor, Viewer)
Why this matters: Understanding who else can edit products helps avoid conflicts when saving changes. The Product Updates section shows a complete history of who modified which products.
Step 6: Keep the Portal Available
You've now seen the cobby Portal's administrative capabilities. We'll do the actual product editing in Excel, which is where the real power lies. Keep the Portal open in a browser tab for reference—you'll occasionally return to it for administrative tasks, but your daily work happens in Excel.
Remember: The Portal is for administrative functions (managing connections, users, and settings), while Excel is for operational tasks (editing products).
Part 3: Opening Excel and Connecting
Now let's move to Excel, where you'll do most of your work.
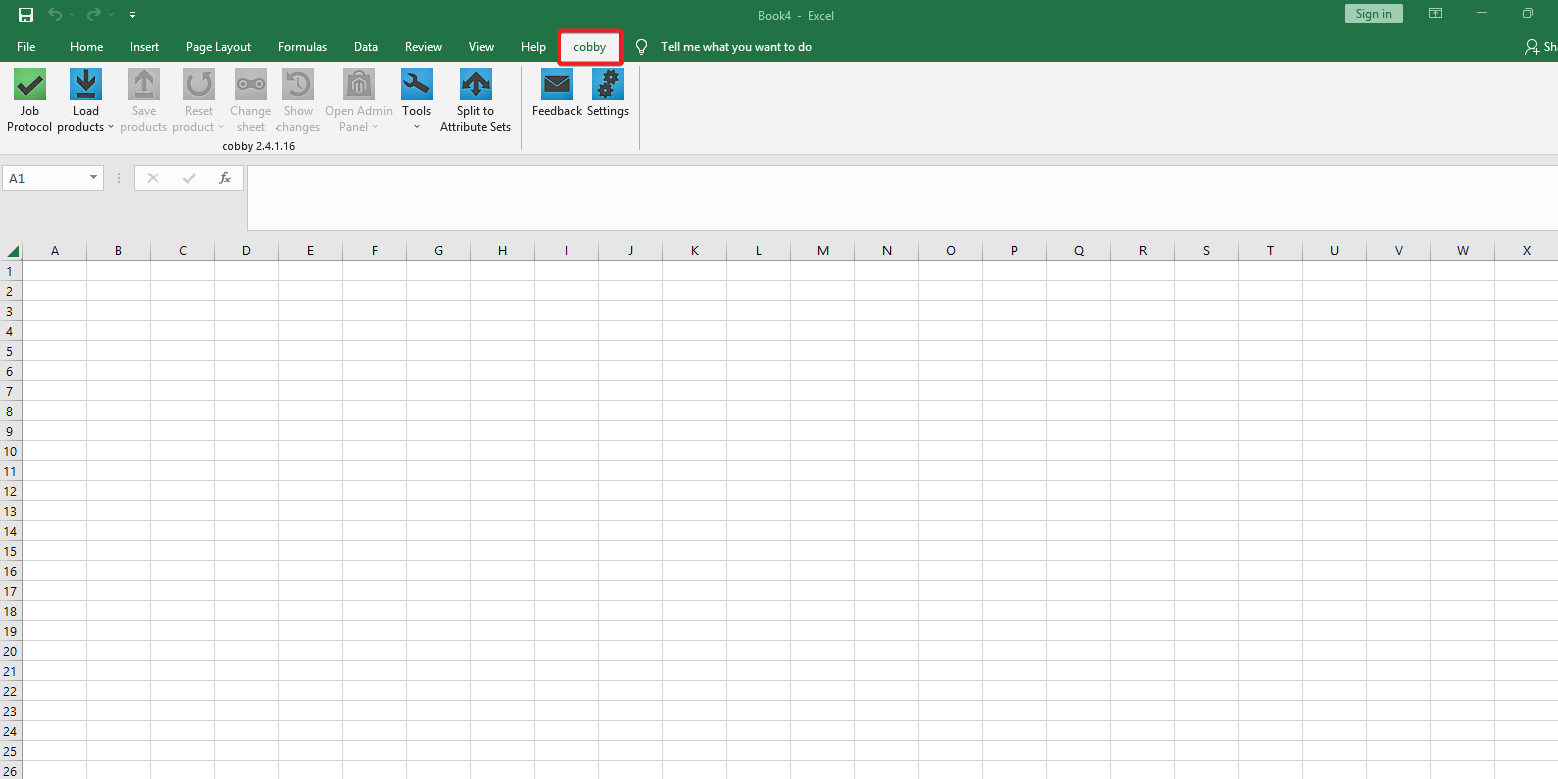
Step 7: Open Excel and Find cobby
- Launch Microsoft Excel
- Create a new blank workbook (or Excel will open one automatically)
- Look at the ribbon menu at the top
- Find and click the "cobby" tab
What you'll see: The cobby ribbon appears with buttons and controls for managing your products.
If the cobby tab is missing, the add-in might not be loaded. See our troubleshooting guide.
Step 8: Understanding the cobby Ribbon
The cobby ribbon has several key sections:
Left side (Product Actions):
- Load products (blue button) - Fetches products from your shop
- Save products (blue button) - Sends your changes back to the shop
- Show changes - Reviews what you've edited
- Refresh products - Updates data from the shop
Middle section (Product Management):
- New product - Creates a new product
- Duplicate product - Copies an existing product
- Delete products - Removes selected products
Right side (Settings & Tools):
- Presets - Switches between different column views
- Filter - Shows only specific products
- Settings - Configures cobby preferences
- Insert Function - Access cobby's custom Excel formulas
You'll use these buttons throughout your cobby workflow.
Step 9: Discover the Task Pane
The Task Pane is a powerful contextual panel that appears on the right side of Excel when you need it:
- Click any cell in your worksheet
- Look for the Task Pane icon in the cobby ribbon
- Click to open it
What you'll see: The Task Pane shows contextual options based on which column you've selected. For example:
- Select a price column → See pricing tools and options
- Select an image column → See image management functions
- Select a category column → See category assignment tools
The Task Pane adapts to your current context, giving you relevant options exactly when you need them.
Step 10: Sign In to Your Workspace
- Click the "Load products" button (blue button on the left)
- A login dialog will appear
- Enter the same credentials you used for the Portal
- Click "Sign In"
What happens: cobby connects to your workspace and prepares to load your products.
Check "Remember me" to avoid logging in every time you open Excel.
Part 4: Loading and Exploring Products
Step 11: Load Your Products
After signing in, your products will automatically begin loading. If not:
- Click the blue "Load products" button in the cobby ribbon
- Wait while cobby fetches your products from the shop
- Watch the progress indicator
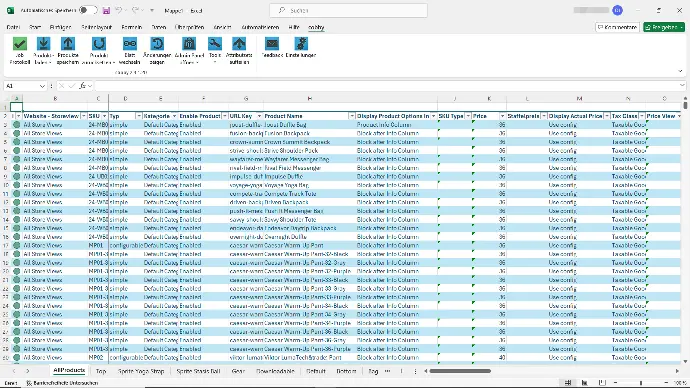
What you'll see: After a few moments (or minutes for large catalogs), your Excel worksheet fills with product data. Each row represents one product, and each column represents a product attribute.
What just happened? cobby connected to your shop through the cobby service, retrieved all product information, and displayed it in Excel format. You're now looking at live data from your store.
- Small catalogs (under 1,000 products): 5-15 seconds
- Medium catalogs (1,000-10,000 products): 30-60 seconds
- Large catalogs (10,000+ products): 1-3 minutes
Step 12: Understand How Products Are Organized
cobby organizes your product data in a smart, intuitive way:
Products arranged per row: Each row represents one complete product with all its attributes.
Attributes displayed in columns: Each column represents a product attribute (name, price, SKU, description, etc.).
Worksheets filtered by attribute sets: Notice the worksheet tabs at the bottom of Excel. cobby creates separate worksheets for each attribute set in your shop. For example:
- A "Default" worksheet for products using the Default attribute set
- A "Clothing" worksheet for products using the Clothing attribute set
- An "AllProducts" worksheet that consolidates everything
The AllProducts Sheet: This special worksheet shows all products regardless of attribute set, making it easy to search your entire catalog at once.
Step 13: Understand the Excel Interface Columns
Let's explore the columns you're seeing:
Column A - Product Status (Colored indicator) This critical column shows synchronization status:
- 🟢 Green: Product is synchronized (Excel matches your shop)
- 🟡 Yellow: You've made changes that aren't saved yet
- 🔴 Red: Someone else changed this product in the shop
Column B - SKU (Stock Keeping Unit) The unique identifier for each product. You'll use this to find specific products quickly.
Column C - Product Type Shows the product type: simple, configurable, bundle, etc.
Column D - Attribute Set The attribute set that determines which attributes this product has. Different attribute sets show different columns because different product types need different attributes.
To understand why attribute sets exist and how they work, see our detailed explanation: Product Attributes and Scopes
Following columns - Product Attributes All the other columns represent product attributes like:
- Name
- Price
- Description
- Weight
- Categories
- Images
- And many more...
Step 14: Recognize Special Column Indicators
cobby uses visual indicators to help you understand your data:
Required Fields (Red Header): Columns with red headers contain required data. If you create a new product or leave a required field empty, cobby highlights it in red to ensure you complete it before saving.
Auxiliary Columns (Yellow Background): If you create your own custom columns in Excel (for notes, calculations, or temporary data), cobby displays them with a yellow background. These auxiliary columns don't affect your product data—they're for your personal use only. You can add formulas, comments, or reference data without worrying about accidentally sending it to your shop.
Example use cases for auxiliary columns:
- Add a "Notes" column for internal comments
- Create a "Margin %" column to calculate profit margins
- Add a "Status" column to track your editing progress
What determines which columns appear? Your active Preset. Presets are saved column configurations that show only the attributes you need for specific tasks.
Step 15: Navigate the Product Data
Let's practice finding and viewing products:
- Scroll right to see more columns (use the arrow keys or scroll bar)
- Use Ctrl+Home to jump back to the first cell
- Use Ctrl+F to open Excel's Find dialog
- Search for a product SKU you know exists
- Press Enter to jump to that product
Tip: The first few columns (Status, SKU, Type, Attribute Set) are usually frozen, so they stay visible as you scroll right.
Step 16: Explore a Preset
Presets help you focus on relevant attributes:
- Look at the Presets dropdown in the cobby ribbon (right side)
- Click the dropdown to see available presets
- Note the current preset name (usually "Default" or "All attributes")
What are presets? Think of presets as different "views" of your products. You might have:
- A "Prices" preset showing only pricing columns
- A "Descriptions" preset showing content fields
- A "Categories" preset showing categorization
- A "Stock" preset showing inventory attributes
We'll use the default preset for now, but you can create custom presets later for specific workflows. Presets are managed in both the Portal and Excel, and can be shared across your team for consistency.
Step 17: Discover cobby Formulas
Excel's standard formulas work great with cobby, but cobby also provides custom functions for special tasks:
- Click the "Insert Function" button in the cobby ribbon
- Browse the available cobby formulas
What you'll find: cobby formulas for:
- Image management: Functions to manipulate product image URLs
- Category operations: Functions to work with category paths
- Attribute processing: Functions to transform attribute values
- And more specialized functions for e-commerce tasks
You can use these cobby formulas alongside Excel's built-in functions (SUM, IF, VLOOKUP, etc.) to create powerful automated workflows.
Part 5: Making Your First Edit
Now comes the exciting part - actually changing product data!
Step 18: Find a Product to Edit
Let's find a product with a simple, identifiable SKU:
- Press Ctrl+F to open Find
- Search for a product SKU (for example, "24-MB01" if you have sample data)
- Click "Find Next" until you locate the product
- Press Escape to close the Find dialog
What you'll see: The selected cell highlights the found product.
For your first edit, choose a test product or one you don't mind changing. You can always revert the change later.
Step 19: Edit the Product Name
Now let's make a simple change to demonstrate the workflow:
- From your selected product row, scroll right to find the "Name" column
- Double-click the Name cell for your chosen product
- Add
_TESTat the end of the product name - Press Enter to confirm
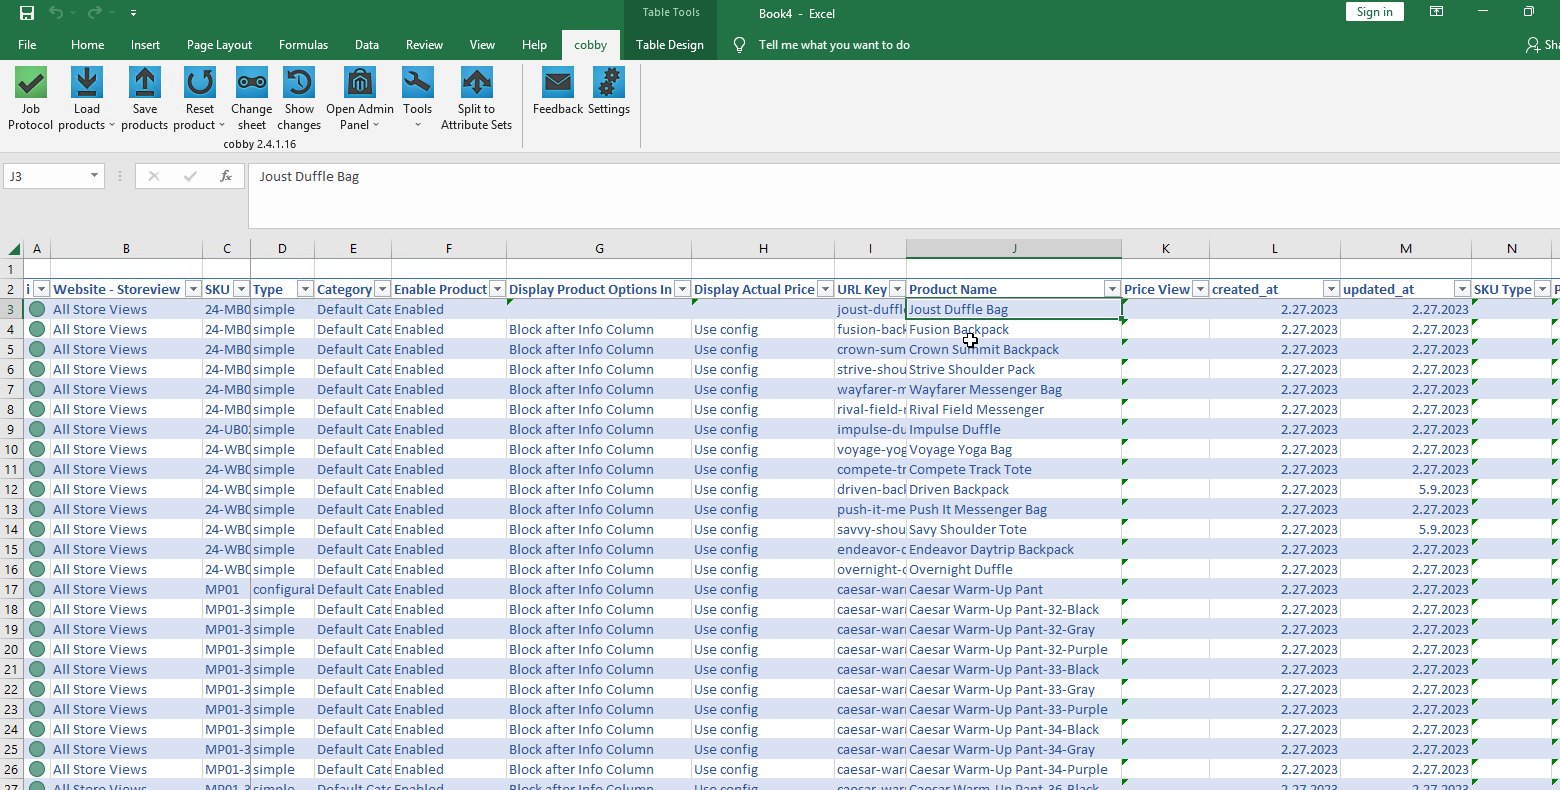
What you'll see immediately: The Product Status column (Column A) for that product changes from green to yellow.
This yellow status means: "You've made a change in Excel that hasn't been saved to your shop yet."
Step 20: Make Additional Changes (Optional)
While you're in edit mode, try making other changes:
- Find the "Price" column
- Change the price value slightly (for example, from 39.00 to 39.99)
- Press Enter
- Notice the Product Status remains yellow
What you're seeing: cobby tracks all changes you make. The yellow status persists until you save.
Step 21: Use the Task Pane for Context
Let's explore how the Task Pane helps:
- Click on the product name cell you just edited
- If the Task Pane isn't open, click the Task Pane icon in the cobby ribbon
- Observe the options available for the Name attribute
What you'll see: Context-specific tools and information related to product names. The Task Pane adapts to whatever column you're working in, providing relevant functions without cluttering your workspace.
Step 22: Review Your Changes
Before saving, let's see exactly what you changed:
- Click anywhere in your edited product's row
- Click the "Show changes" button in the cobby ribbon
- A History Task Pane opens on the right side of Excel
What you'll see:
- Attribute name: Which field you changed (e.g., "Name", "Price")
- Magento value: The original value in your shop
- Excel value: Your new value
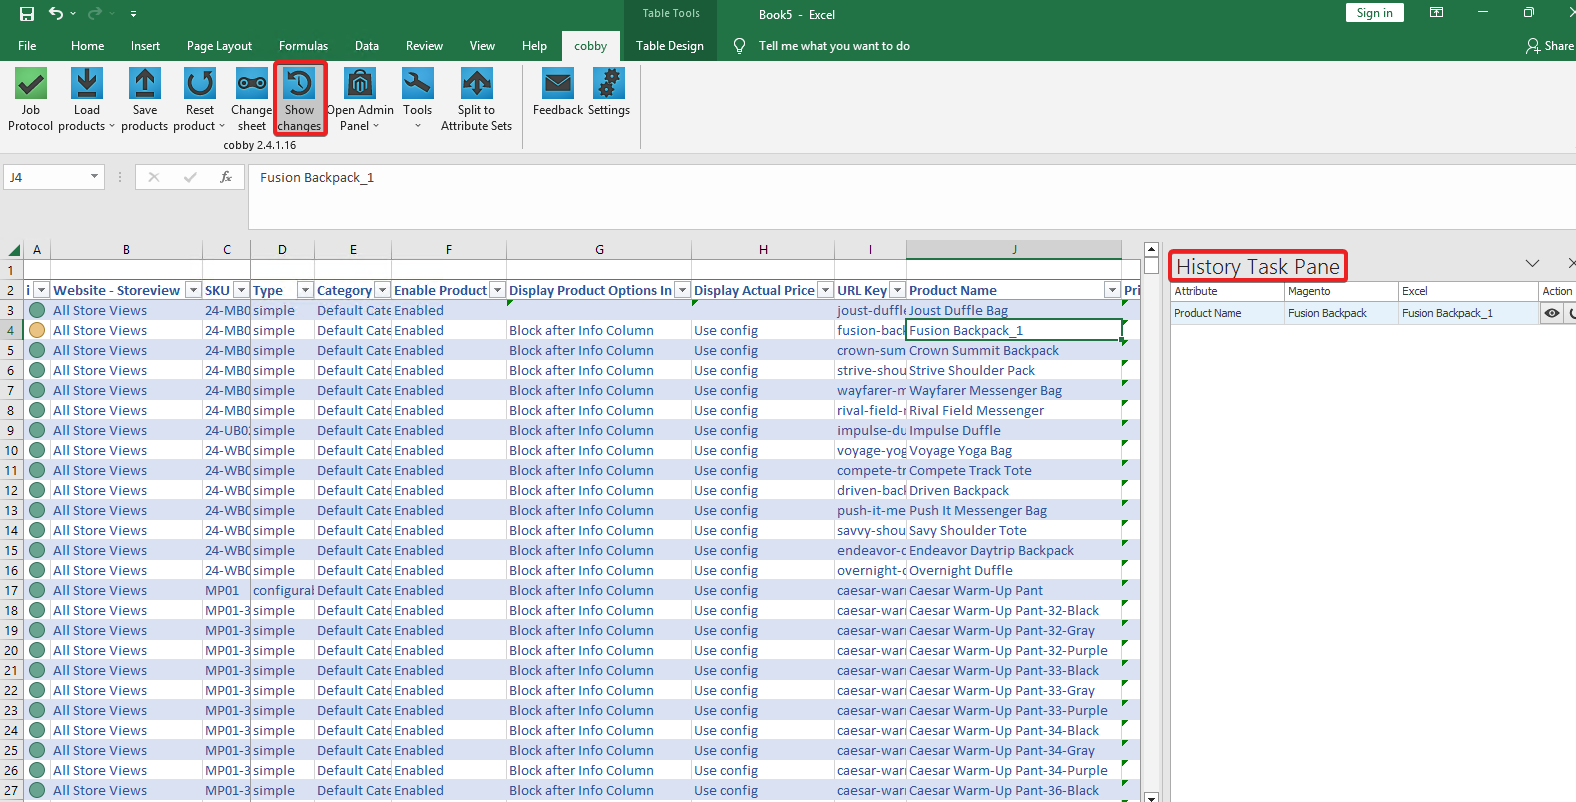
This is your safety check - you can confirm your changes are correct before they go live.
Part 6: Saving Changes to Your Shop
Step 23: Save Your Changes
Time to make your edits live:
- Click the "Save products" button in the cobby ribbon (blue button)
- Wait while cobby processes your changes
- Watch the Product Status indicator
What you'll see:
- A progress bar or message showing the save is in progress
- The Product Status changes from yellow to green when complete
- A confirmation message that your changes were saved

What just happened behind the scenes:
- Excel sent your changes to the cobby service
- The cobby service sent them to your shop's cobby extension
- The extension applied the changes to Magento/Shopware
- Magento confirmed the changes were successful
- cobby updated the status to synchronized (green)
Step 24: Verify the Changes
Let's confirm your changes are really in your shop:
- Open your Magento/Shopware admin panel in a web browser
- Navigate to Catalog > Products
- Find the product you edited (search by SKU)
- Open the product
- Verify your changes appear (the name has "_TEST", price is updated, etc.)
Success! Your changes from Excel are now live in your shop.
Depending on your shop's cache settings, you might need to clear cache before seeing changes on the storefront.
Step 25: Check the Portal's Product History
Now let's see how the Portal tracked your changes:
- Switch to your browser with the cobby Portal open
- Navigate to Product Updates
- Look for your recent change
What you'll see:
- Your username
- The product SKU you modified
- The date and time of the change
- Which attributes were updated
This history is invaluable for team coordination and auditing—you can always see who changed what and when.
Part 7: Understanding Excel vs. Portal
You've now worked in both the cobby Portal and Excel. Let's clarify when to use each:
Use Excel For (Operational Tasks):
- Editing product data (names, prices, descriptions, attributes)
- Bulk updates across many products
- Using formulas to calculate values
- Filtering and searching products
- Daily product management tasks
- Creating auxiliary columns for notes and calculations
- Working with cobby formulas for advanced operations
Excel is your workspace - where you spend most of your time.
Use the cobby Portal For (Administrative Tasks):
- Managing users and team permissions
- Checking connection status to your shop
- Downloading plugins for your e-commerce platform
- Viewing job history and tracking background tasks
- Reviewing product history to see who changed what
- Configuring workspace settings
- Managing presets (can also be done in Excel)
- Updating billing and subscription information
- Executing resynchronization when needed
- Testing connectivity and updating shop credentials
The Portal is your admin dashboard - where you manage the cobby system itself.
Why Two Interfaces?
This separation of concerns makes cobby more powerful:
- Excel gives you the familiar spreadsheet power for product editing without cluttering it with administrative controls
- Portal provides centralized management, monitoring, and team coordination without interfering with your product work
Most users open the Portal occasionally (weekly or monthly) but use Excel daily. Think of the Portal as your control center and Excel as your workshop.
Part 8: Key Concepts to Remember
Product Status Colors
Always watch Column A (Product Status):
| Color | Meaning | What to Do |
|---|---|---|
| 🟢 Green | Synchronized | No action needed |
| 🟡 Yellow | You have unsaved changes | Save when ready |
| 🔴 Red | Shop changed, Excel outdated | Reload products to sync |
The cobby Workflow
Remember these three core actions:
- Load products - Get the latest data from your shop
- Edit in Excel - Make your changes
- Save products - Send changes back to your shop
This workflow repeats throughout your day.
Excel Organization
Remember how cobby structures your data:
- Rows = Products: Each row is one complete product
- Columns = Attributes: Each column is one product attribute
- Worksheets = Attribute Sets: Each worksheet shows products from one attribute set
- AllProducts Sheet: Special worksheet showing everything together
- Red Headers: Required fields that must be filled
- Yellow Columns: Your auxiliary columns that don't affect product data
Working with Others
If multiple people use cobby:
- Before editing: Load products to get the latest data
- During editing: Watch for red status (someone else saved)
- After editing: Save promptly to avoid conflicts
- Check Product History: Use the Portal to see who changed what
Presets Speed Up Your Work
As you become comfortable:
- Create presets for specific tasks (e.g., "Price Updates", "Content Writing")
- Switch presets to see only relevant columns
- Share presets with your team for consistency
- Manage presets in either the Portal or Excel
The Task Pane Provides Context
Remember to use the Task Pane:
- Opens with relevant options based on your selected column
- Adapts to your current context
- Provides quick access to specialized functions
- Keeps your workspace clean by showing options only when needed
cobby Formulas Extend Excel
Don't forget cobby's custom formulas:
- Access them via the Insert Function button
- Use them for image management, category operations, and more
- Combine them with Excel's built-in formulas
- Great for automating repetitive tasks
What You've Accomplished
Congratulations! In this tutorial, you've:
- Understood what cobby does and why it exists
- Learned the two-interface architecture (Portal for admin, Excel for operations)
- Explored the cobby Portal and its administrative features
- Navigated the Portal's sections (Jobs, Product History, Settings)
- Checked your shop connection status
- Opened Excel and connected to your workspace
- Loaded products into Excel
- Understood how products are organized (rows, columns, worksheets)
- Learned about special columns (required fields, auxiliary columns)
- Discovered the Task Pane and cobby formulas
- Made your first product edit
- Reviewed your changes before saving
- Saved changes back to your live shop
- Verified changes in both your shop admin and the Portal's Product History
- Learned the distinct roles of Excel and the Portal
You now understand the complete cobby workflow and architecture!
Next Steps
Now that you've completed the comprehensive onboarding and mastered both the cobby Portal and Excel, explore more cobby features:
Learn More Product Management
- Working with categories - Organize products into categories
- Managing images - Upload and arrange product images
- Handling configurable products - Work with product variations
Optimize Your Workflow
- Using Excel formulas - Automate calculations with cobby formulas
- Filtering products - Load only what you need
- Creating presets - Customize your column views
- Creating auxiliary columns - Create custom columns for your workflow
Solve Specific Problems
- Update prices in bulk - Change multiple product prices
- Optimize metadata for SEO - Improve search rankings
- Import external data - Bring data from other sources
Troubleshooting
- Fix connection issues - Resolve connectivity problems
- Understanding error messages - Interpret validation errors
Quick Reference
Keep these shortcuts handy:
| Action | Button/Shortcut |
|---|---|
| Load products from shop | Blue "Load products" button |
| Save changes to shop | Blue "Save products" button |
| Find a product | Ctrl+F in Excel |
| Review changes | "Show changes" button |
| Go to first cell | Ctrl+Home |
| Refresh shop data | "Refresh products" button |
| Open Task Pane | Task Pane icon in cobby ribbon |
| Access cobby formulas | "Insert Function" button |
| Switch presets | Presets dropdown (right side of ribbon) |
The best way to learn cobby is to use it regularly. Start with small tasks like updating a few product names or prices, then gradually tackle larger projects as you grow comfortable with both Excel and the Portal.
If you run into issues or have questions:
- Check our How-To Guides for specific tasks
- Visit our Reference section for technical details
- Review job status in the Portal's Jobs section
- Contact support
Happy editing with cobby!