How to Manage Product Images via Task Pane
Goal: Manually add, organize, and manage product images directly from Excel using the cobby Task Pane, without using formulas.
Prerequisites
- Excel with cobby installed
- Products loaded in Excel
- Image files accessible on your local computer
- Basic familiarity with cobby's Excel interface
Interactive Demo
Watch this interactive walkthrough to see image management in action:
When to Use Task Pane for Images
Use the Task Pane when you need to:
- Manually add individual images to products
- Visually organize and reorder images
- Edit image properties and metadata (labels, roles, visibility)
- Copy images between a few products
- Make quick, one-off image updates
Consider formulas instead when you need to:
- Bulk add images to hundreds of products
- Use consistent naming patterns (SKU-based filenames)
- Automate image assignments
- See How to Add Images to Products for formula-based approaches
Add Images via Task Pane
1. Select Product
- Open your Excel workbook with loaded products
- Navigate to the Images column
- Click on the Images cell for the product you want to update

The cobby Task Pane opens on the right side, showing currently assigned images.
2. Add New Image
- In the cobby Task Pane, click the Add button
- A file browser window opens
- Navigate to your image file location
- Select the image file(s) you want to add
- Click Open

Tip: Hold Ctrl while clicking to select multiple files, or Shift+Click for range selection. All selected images will be added to the product at once.
3. Automatic Upload
- Images are automatically uploaded in the background
- Upload progress may be shown briefly
- Images are prepared for shop system sync
- No manual upload step required
4. Save to Shop System
- Review the images in the Task Pane
- Click Save products in cobby toolbar
- Images are immediately stored in your shop system
- Images become available in your store frontend
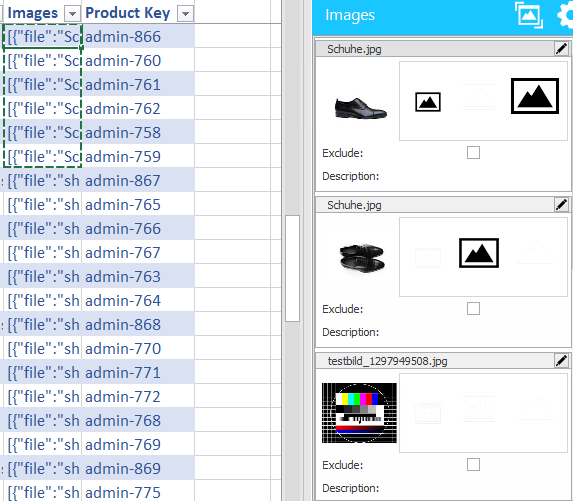
Organize Images in Task Pane
View Images
- All assigned images appear in the Task Pane
- Images display in their assigned order
- Click on an image to select it
- Use preview to verify image quality and appearance
Reorder Images
- Select an image in the Task Pane
- Use the up/down arrows or drag-and-drop to change position
- Position determines frontend display order
- First image is typically the main product image shown in listings
Why order matters: The image order controls which image appears as the primary product image in category pages, search results, and product detail pages.
Remove Images
- Select the image in the Task Pane
- Click the Remove or Delete button
- Image is removed from the product
- Save products to sync deletion to your shop system
Note: Removing an image from cobby will delete it from the product but may not delete the file from the server, depending on your shop system configuration.
Edit Image Properties and Metadata
The Task Pane allows you to edit comprehensive image metadata that affects SEO and display behavior.
1. Access Image Properties
- Select an image in the Task Pane
- The properties panel displays below or alongside the image
- Modify any available properties
2. Available Image Properties
Label/Description
- Main image label or description
- Used for internal organization
- May be displayed in some shop themes
- Useful for identifying images in the backend
Image Roles (varies by shop system)
- Base Image: Main product image for detail pages
- Small Image: Thumbnail for product listings
- Thumbnail: Tiny preview images (cart, mini-cart)
- Swatch Image: For color/pattern swatches
Alt Text
- Alternative text for accessibility
- Displayed when image fails to load
- Important for SEO and screen readers
- Should describe the image content
Visibility Settings
- Exclude from frontend: Hide image from store display
- Useful for internal reference images
- Image remains attached to product but won't display publicly
Custom Image Codes (shop system-specific)
- Custom attributes defined in your shop system
- Varies based on configuration
- Consult your shop system documentation
3. Apply Changes
- Modify properties directly in the Task Pane
- Changes apply immediately in Excel
- Click Save products to sync to your shop system
- Verify changes in your store frontend
Best practice: Set alt text and labels for all images to improve SEO and accessibility.
Copy Images Between Products
Scenario
Multiple products share the same image (e.g., product variations, items from the same manufacturer, or products with shared lifestyle images).
Steps
1. Filter Products
- Navigate to your products worksheet
- Apply a filter to the relevant column (e.g., Manufacturer, Category, Product Line)
- Select the value to filter by (e.g., "Nike")
2. Add Image to First Product
- Click the Images cell for the first filtered product
- Use the Add button in Task Pane
- Select and add the shared image
- Verify the image appears in the Task Pane
3. Copy Image to Other Products
- Click on the Images cell with the newly added image
- Copy the cell (Ctrl+C)
- Select the Images cells for other filtered products
- Paste (Ctrl+V)
The same image is now assigned to all selected products.
4. Save Changes
- Click Save products in cobby
- All products now have the shared image
- Verify in your shop system admin or frontend
Common Use Cases
Single Image Per Product
When to use:
- Quick manual image assignments
- One-off product updates
- Testing image appearance
- Products with unique images
Steps:
- Select product Images cell
- Click Add in Task Pane
- Choose image file
- Save products
Shared Images Across Products
When to use:
- Product variations (size, color)
- Same manufacturer logo/brand image
- Generic category images
- Placeholder images
Steps:
- Add image to one product
- Copy the Images cell
- Paste to other products
- Save products
Multiple Images Per Product
When to use:
- Products requiring multiple views
- Detail shots needed
- Lifestyle and product images combined
- 360-degree views
Steps:
- Select product Images cell
- Click Add multiple times for different images
- Or select multiple files at once in file browser
- Arrange order using drag-and-drop
- Assign roles and properties to each image
- Save products
Image Metadata Management
When to use:
- Improving SEO with alt text
- Setting specific image roles (base, thumbnail, swatch)
- Managing multi-store visibility
- Adding descriptive labels for organization
Steps:
- Select product Images cell
- Click on specific image in Task Pane
- Edit properties (label, alt text, roles, visibility)
- Repeat for each image
- Save products
Troubleshooting
Add button not working
- Verify product is selected (Images cell is active)
- Check cobby Task Pane is open
- Ensure cobby connection is active
- Try reloading products
Images not uploading
- Check file format is supported (JPG, PNG, GIF)
- Verify file size isn't too large (check your shop system limits)
- Check file isn't corrupted (open it in image viewer)
- Review file permissions
Copied images not pasting
- Ensure you copied the Images cell, not the image preview
- Verify paste destination is also in the Images column
- Check cell format is compatible
- Try copy-paste on a single cell first to test
Images not saving to shop system
- Click Save products button in cobby toolbar
- Check cobby connection status (green indicator)
- Verify you have permissions to update products
- Review shop system logs for errors
Wrong images appearing
- Clear Excel cell and re-add image
- Verify correct product is selected
- Check image cache in shop system (flush cache)
- Clear browser cache when viewing frontend
Image properties not updating
- Ensure you clicked Save products after editing
- Verify properties are supported by your shop system
- Check that you have permission to edit image metadata
- Review shop system configuration for image attributes
Images displaying in wrong order on frontend
- Check image order in Task Pane matches desired order
- Save products to sync order to shop system
- Clear shop system cache
- Verify theme uses standard image order logic
Best Practices
File Organization
Before adding images:
- Organize images in a clear folder structure by category or product line
- Use consistent naming convention (e.g.,
SKU_view.jpgorproductname_angle.jpg) - Keep images in easily accessible location on your computer
- Remove old/unused images from folders to avoid confusion
Image Quality
Optimize images before upload:
- Use appropriate resolution (72-150 DPI for web)
- Compress images to reduce file size without visible quality loss
- Maintain consistent aspect ratios within product categories
- Remove unnecessary metadata (EXIF data) to reduce file size
Recommended dimensions (check your shop system requirements):
- Main product images: 1200-2000px on longest side
- Thumbnails: Generated automatically by shop system
- Consistent dimensions across similar products for uniform display
Batch Operations
For efficiency:
- Filter products by relevant criteria (category, brand, etc.)
- Add images to the first product
- Copy to similar products using Excel copy-paste
- Save once for all changes
- Reduces repetitive clicking and saves time
Image Metadata
Always provide:
- Alt text: Describe what's in the image for accessibility and SEO
- Descriptive labels: Help with organization and backend management
- Appropriate roles: Ensure correct images display in correct contexts
- Consistent naming: Makes future updates easier
Verification
After adding images:
- Review in Task Pane before saving (check order, properties)
- Check image order is correct for frontend display
- Verify image roles are set appropriately (base, small, thumbnail)
- Test in shop system frontend after save
- Clear cache if images don't appear immediately
- Check on mobile devices to ensure responsive display
Advanced Tips
Multiple Images at Once
Select multiple image files in the file browser:
- Hold Ctrl while clicking individual files
- Or Shift+Click for range selection
- All selected images add to the product in one operation
- Order typically follows file selection order or filename sort order
Quick Image Replacement
To replace an image:
- Remove old image from Task Pane
- Add new image using Add button
- Or use formula method for bulk replacement (see How to Add Images to Products)
Image Preview
Enable the Image Preview feature to view full-size images while working with product data. See How to Preview Images for details.
Combine Methods
Mix manual Task Pane and formula approaches for maximum efficiency:
- Use formulas for bulk operations and consistent patterns
- Use Task Pane for exceptions and one-off updates
- Use copy-paste for shared images across product groups
- Use Add button for unique cases requiring visual verification
Working with Image Descriptions at Scale
For bulk image description management, consider using formulas:
- See How to Manage Image Descriptions for formula-based approaches
- Particularly useful when applying consistent labeling patterns across many products
Related Documentation
How-To Guides:
- How to Add Images to Products - Formula-based bulk image addition
- How to Preview Images - View images while working
- How to Manage Image Descriptions - Bulk label and description management
Reference:
- Task Pane Reference - Complete Task Pane feature documentation
- Excel Toolbar - cobby toolbar button reference
Tutorials:
- Introduction to cobby - Getting started with cobby basics